| SUSE LINUX – User Guide Chapter 4. YaST — Configuration / 4.5. Network Devices | ||||
|---|---|---|---|---|
 | 4.4. Hardware | 4.6. Network Services |  | |
| SUSE LINUX – User Guide Chapter 4. YaST — Configuration / 4.5. Network Devices | ||||
|---|---|---|---|---|
| 4.4. Hardware | 4.6. Network Services | | |
All the machines connected to the Internet form a large network in which various operating systems run with different hardware. The Internet uses a standard communication protocol that can be understood regardless of the hardware or software used. This is made possible by means of the Internet Protocol (IP) together with the Transmission Control Protocol (TCP), the User Datagram Protocol (UDP), and the Internet Control Message Protocol (ICMP). These protocols comprise the common language used by all machines on the Internet. The abbreviation for this is TCP/IP.
Every machine on the Internet has an ID number — the IP address. It can only be addressed by TCP/IP with this number. Normally, a machine also has a text name. The Domain Name System (DNS) is responsible for converting the IP address to a text name. This particular service is offered by name servers. A machine or an application offering a service is called a server (for example, a DNS server) and a machine or application making use of a service is called a client.
Under TCP/IP, there are various standardized protocols for forwarding the appropriate TCP/IP data transfers to the given transmission method. For network connections via a network card, the ethernet protocol is used. For modem and ISDN telephone connections, it is the point-to-point protocol (PPP). For ADSL and T-DSL connections, the point-to-point over ethernet Protocol (PPPoE) is used.
To establish an Internet connection, the ethernet, PPP, or PPPoE connection between your host and a host of the Internet provider must be established first. Then the TCP/IP connection must be established. Various standardized protocols work on top of TCP/IP for proper data transfer to the application:
The HyperText Transfer Protocol (HTTP) is used for the transfer of web sites in HyperText Markup Language (HTML) format.
The Simple Mail Transfer Protocol (SMTP) is responsible for sending e-mails to another machine and the Post Office Protocol (POP3) for downloading e-mails from a mail server.
The File Transfer Protocol (FTP) is used to transfer files.
For several application programs, such as a web browser and an e-mail program, to use the same Internet connection at the same time, separate TCP/IP connections are used for each application. Large amounts of TCP/IP data are also divided into small packets, so HTTP packets from the web browser can be sent over its TCP/IP connection while alternating with SMTP or POP3 packet transfers from the e-mail program via other TCP/IP connections.
As several applications use the same Internet connection, the IP address, which only identifies the machine, is not sufficient. A port number is needed to sort out which TCP/IP data belongs to which application. These standard services are usually provided on servers at the following port numbers:
DNS on port 53
HTTP on port 80
SMTP on port 25 and POP3 on port 110
FTP on ports 20 and 21
The client can only use services if it addresses the correct port number on the server.
If you activate or in the YaST modules, the Internet connection is established automatically whenever necessary, for example, when an external URL is entered in the browser or when e-mail is sent and fetched. or is only advisable if you have a flat rate for Internet access. With , the computer only establishes a connection to the Internet when you want it to do so. Background processes, such as fetching e-mail in regular intervals, frequently establish connections to the Internet, which can be expensive. To connect to the Internet, you can use the KDE program KInternet, described in Section 5.4.1. “KInternet — Connecting to the Internet”.
When the YaST module is started, an overview of the network configuration is displayed. The upper part of the dialog lists all network cards that were automatically detected or manually configured. If your card was detected correctly when the system was booted, the name of the card appears here. Devices that were not recognized are listed as . The lower part of the screen lists configured devices including the network type and the address. You can configure new network cards or modify the configuration of a configured device.
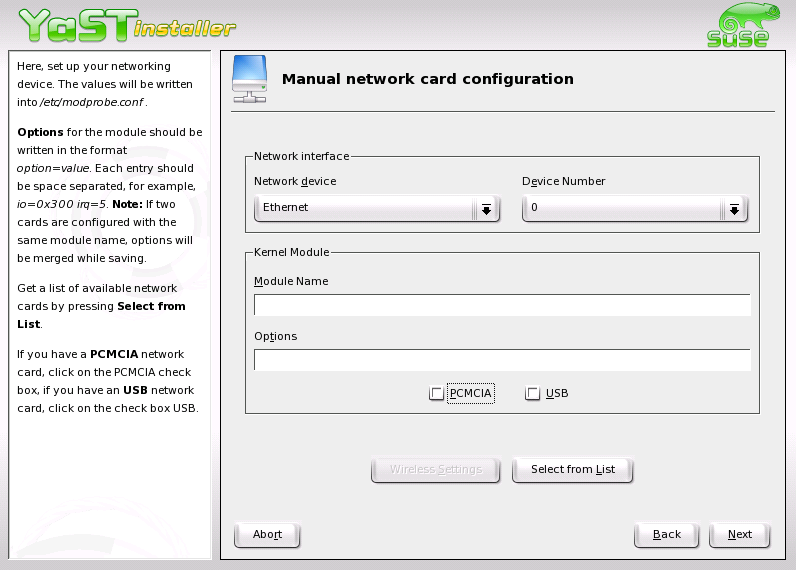
Make the following basic settings to configure a network card that was not recognized:
Specify the network type and the device number.
If you are located in a wireless LAN and your network card supports this connection type, use to access the dialog in which to configure the operating mode, network name (ESSID), network ID (NWID), encryption key, and nickname. Press to complete the configuration of your card.
If your network card is a PCMCIA or USB device, activate the respective check boxes and exit the dialog with . If not, select the network card model with . YaST automatically selects a suitable kernel module. Exit this dialog with .
Specify the address assignment method for your network card:
If a DHCP server exists in your network, automatically retrieve the configuration data for your network card from there. Activate the address assignment with DHCP if your DSL provider has not given you a static IP address for your system. Click to access the client configuration. Here, specify whether the DHCP server should always respond to a broadcast. Additionally, you can specify an ID. By default, the host is identified by means of the hardware address of the network card. However, if you have several virtual machines using the same network card, distinguish them by means of various IDs.
If you have a static IP address, activate the respective check box. Enter the IP address and the correct subnet mask for your network. The preset value for the subnet mask should meet the requirements of a typical home network.
Exit this dialog with or configure the host name, name server, and routing. Refer to Sections 4.6.1. “Host Name and DNS” and 4.6.6. “Routing”.
In some countries (US, Austria), Internet access via cable modems has become relatively widespread. The cable subscriber gets a modem-like device from the ISP, which is connected to the TV cable network on one side and to the computer on the other using a 10BaseT (twisted pair) cable and a network card. As far as the computer is concerned, this is basically a permanent network link with a static IP address.
Following your provider's specification, select either or for the configuration of your network card. Most providers today use DHCP. A static IP address is generally included in a provider's business package. In this case, the provider should have assigned a static IP address. Regarding the setup and configuration of cable modems, refer to the Support Database article available online at http://sdb.suse.de/en/sdb/html/cmodem8.html.
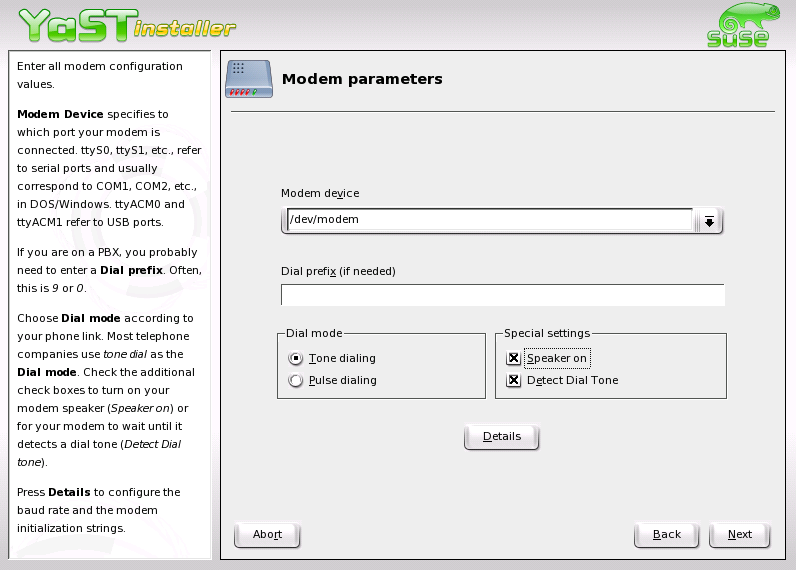
In the YaST Control Center, the modem configuration is available under . If the autodetection fails, select the manual configuration. In the dialog that opens, enter the port under .
If a PBX is interposed, you may need to enter an extra number to dial external numbers (usually a zero, but you can find this out in the operation instructions for your telephone system). Also decide between tone and pulse dialing, whether the speaker should be switched on, and whether it should wait for the dial tone. The last option should not be used if your modem is connected to a PBX.
The baud rate and the initialization string settings for the modem can be specified under . Only make changes if your modem has not automatically been recognized and special settings must be made for data transfer. This is primarily the case for ISDN terminal adapters. Exit this dialog with .
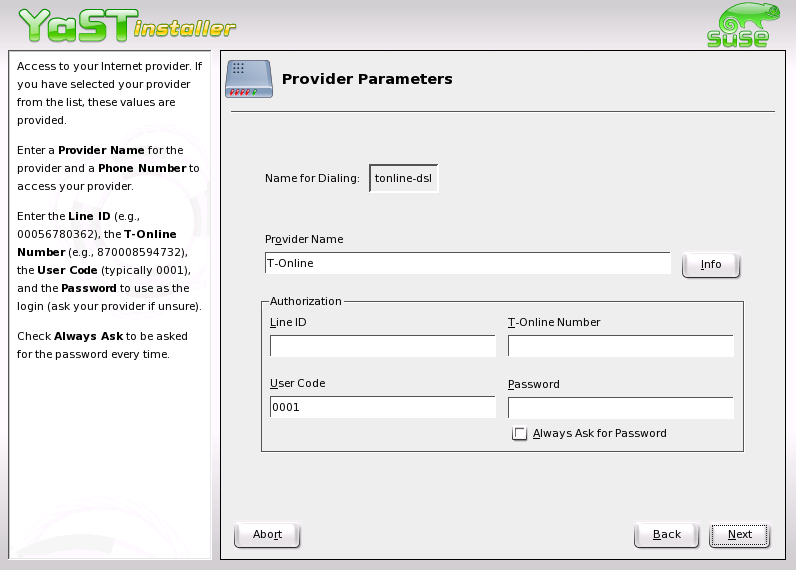
Select the ISP (Internet Service Provider) in the following dialog. To select your provider from a list of preconfigured providers in your country, activate . Configure the ISP parameters manually by pressing . In the dialog that opens, enter the name of the dial-up connection, the provider, and the provider's phone number. Furthermore, enter the user name and the password assigned by your provider. Activate to be prompted for the password every time a connection is established.
Enter the connection parameters in the final dialog:
Refer to Section 4.5.1. “Information about the Internet Dial-Up”. Enter at least one name server to use dial-on-demand.
This check box is activated by default. Accordingly, the name server is adjusted each time a dial-up connection is established. Deactivate this setting and specify static name servers for .
This option is activated by default. Input prompts by the dial-up server are ignored to facilitate the establishment of the connection.
Here, activate the SUSE Firewall to implement protection against intruders when connected to the Internet.
Here, specify the period after which the connection should be terminated if there is no data transfer.
With this button, enter the address configuration dialog. If your provider has not assigned a dynamic IP address, deactivate and enter the local IP address of your host and the remote IP address. Contact your provider for information about these settings. Leave the setting active and exit the dialog with .
Press to return to the overview and view the configuration. Complete the configuration with .
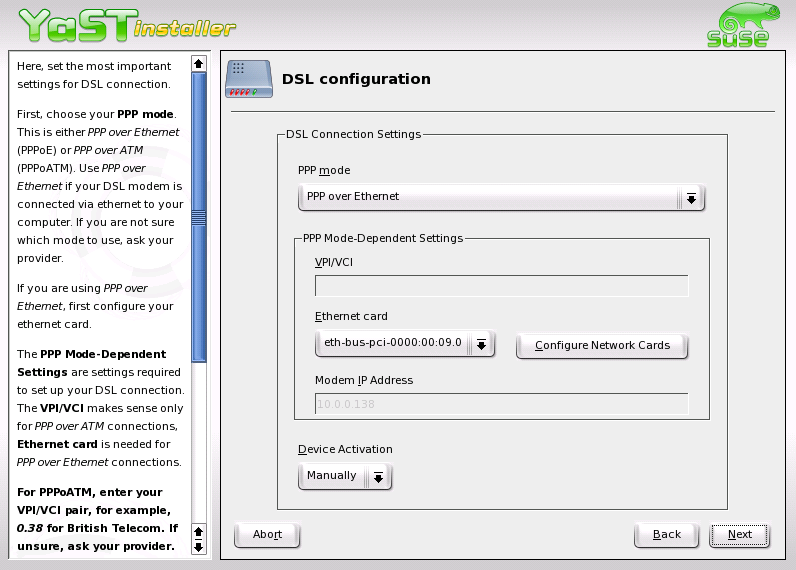
The YaST module in the category is designed for the configuration of DSL. Several dialogs enable you to enter the data for your DSL access. YaST supports the configuration of DSL based on the following protocols:
PPP over ethernet (PPPoE) — Germany
PPP over ATM (PPPoATM) — England
CAPI for ADSL (Fritz cards)
Tunnel protocol for point-to-point (PPTP) — Austria
The configuration of your DSL access with PPPoE and PPTP is only possible if your network card is configured correctly. If this has not been done, select to access the dialog for configuring your network card. See Figure 4.5.2. “Network Card”. The DHCP protocol is not used for the automatic assignment of IP addresses for DSL. Therefore, do not use . Instead, use a static dummy IP address like 192.168.22.1. In , enter 255.255.255.0. For a stand-alone system, do not make any entries in the field.
![[Tip]](admon/tip.png) | Tip |
|---|---|
The values for the of your host and are merely placeholders. They are not used for establishing a connection with DSL and are only needed for activating the network card. | |
At the beginning of the configuration, as shown in Figure 4.18. “DSL Configuration”, select the PPP mode and the ethernet card to which your modem is connected (usually eth0). With, determine whether the DSL connection should be established automatically when the system is booted or established manually. Subsequently, select your country and provider. The contents of the following dialogs depend on the previously selected settings. If you are not sure about some options, read the detailed help texts in the dialogs.
To use (see Section 4.5.1. “Information about the Internet Dial-Up”) for a stand-alone system, configure a DNS server. Today, most providers support dynamic DNS assignment, so a valid IP address of the name server is provided each time a connection is established. Nevertheless, a suitable dummy DNS must be entered in this dialog, such as 192.168.22.99. If you are not dynamically assigned a name server, specify the IP addresses of your provider's name server here.
allows you to set an idle time after which the connection is terminated automatically. A value between 60 and 300 seconds is recommended.
| Tip |
|---|---|
If you select , the connection is not terminated completely after the time-out, but remains in a standby mode that enables the automatic establishment of a connection as soon as data needs to be transferred. If you do not use , the connection is terminated completely, requiring the manual establishment of a connection before data can be transmitted. For this case, block automatic establishment of a connection by setting the idle time to 0. | |
The configuration of T-DSL (German Telecom) is similar to ADSL. If you select the provider , continue automatically to the configuration dialog for T-DSL. Furthermore, you need the connection ID, T-Online number, user ID, and personal password specified in your T-DSL registration documents.
This module enables the configuration of one or several ISDN cards in your system. If the ISDN card is not automatically detected by YaST, select the card manually. Theoretically, you can configure several interfaces. However, this is usually not necessary for home users, as several providers can be configured for one interface. The following dialogs provide for the configuration of the various ISDN parameters for operating the card.
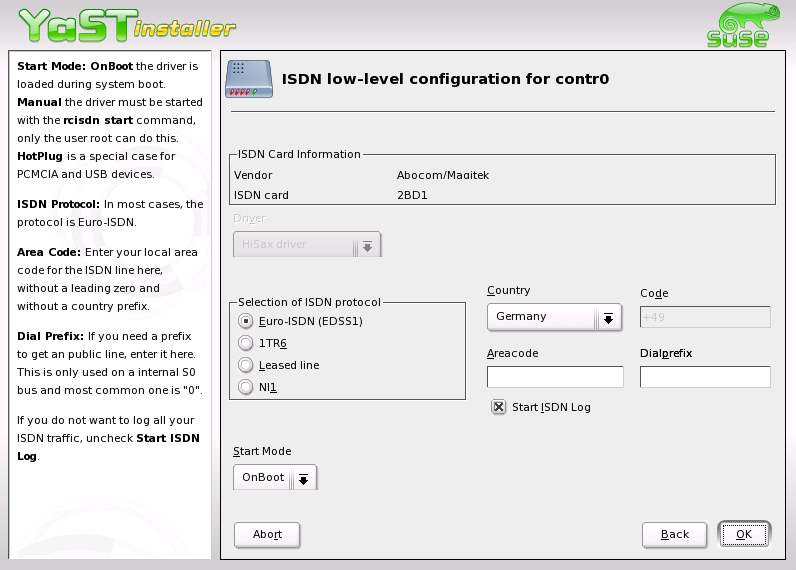
The next dialog, shown in Figure 4.20. “ISDN Configuration”, is used for the . The standard setting for Europe is (refer to scenarios 1 and 2a below). is a protocol used by older or large phone systems (refer to scenario 2b below). The standard setting for the US is . Select the country code from the selection box. In the adjacent input field, enter the area code for your location (e.g., 212 for New York). If necessary, enter the prefix for external calls.
Use to set the start mode for the current ISDN card. initializes the ISDN driver to when the system is booted. With , the ISDN driver must be initialized manually by the user root with rcisdn start. loads the driver when the PCMCIA card or USB device is connected. Complete all settings and click .
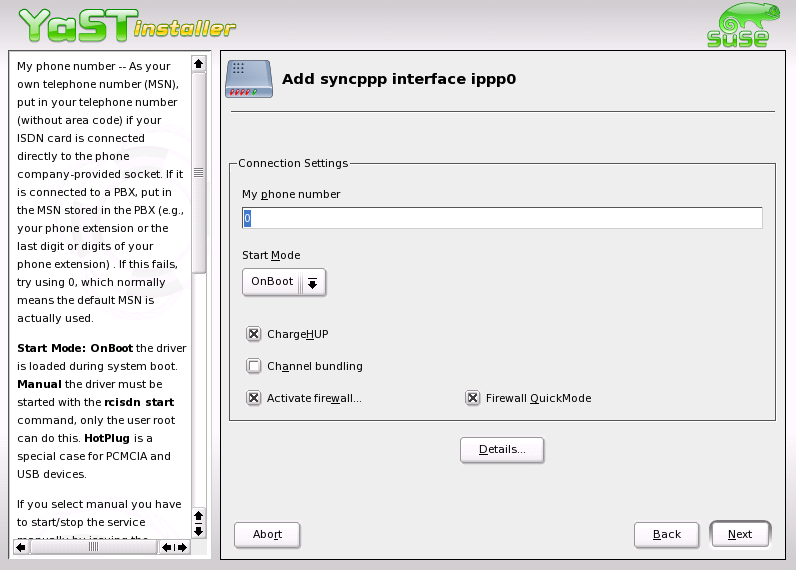
In the following dialog, define the interface for your ISDN card or add further providers to existing interfaces. Set up the interfaces with the SyncPPP or RawIP modes. Most Internet providers use SyncPPP, which is described below.
Depending on the connection scenario, specify one of the following for :
The ISDN card is connected directly to the socket
By default, ISDN offers three numbers (MSN — multiple subscriber number). On request, up to ten numbers can be made available for your line. Assign one of the MSN numbers to your ISDN card. Enter the number without the prefix. If you enter an incorrect number, your telecom provider will automatically use the first MSN assigned to your ISDN line.
The ISDN card is connected to a PBX
Various specifications are required depending on the constellation.
For private use: Usually the Euro-ISDN or EDSS1 protocol is used for the internal ports of small phone systems. These phone systems use an internal S0 bus and use internal numbers for the connected devices.
Use one of the internal numbers to specify the MSN. One of the MSNs of your phone system should work, provided external access is possible with this MSN. As a final resort, a single zero might work. For more information, refer to the documentation of your phone system.
For commercial use: Normally, the 1TR6 protocol is used for the internal ports of large phone systems. Here, the MSN is called EAZ and is usually the extension. For the Linux configuration, the last digit of the EAZ is normally sufficient. If this does not work, try the digits 1 to 9.
By means of a check box, determine whether existing connections should be terminated prior to the next charge increment (). However, this does not yet work with all providers. For (multilink PPP), activate the respective check box. To start SUSEfirewall2, mark .
opens a dialog that enables the implementation of more complex connection scenarios. Normal home users do not need this dialog. Exit the dialog with .
In the following dialog, specify the settings for the assignment of the IP address. If your provider has not assigned a static IP address, select . If you have a static IP address, enter the local IP address of your host and the remote IP address as specified by the provider in the respective fields. If the interface should be used as standard route to the Internet, activate . Only one interface per system can be used as the default route. Exit the dialog with .
Specify your country and your provider in the following dialog. The listed providers are call-by-call providers. To use a provider that is not listed here, click . The dialog opens, allowing entry of all settings for the desired provider. The default setting for is . The phone number may not contain any separators, such as commas or blanks. Enter the user name and password received from your provider. Then click .
To use (see page 4.5.1. “Information about the Internet Dial-Up”) if you have a stand-alone system, enter a name server. Most providers today support dynamic DNS assignment, so a current IP address is forwarded to the name server each time the connection is set up. However, a suitable dummy name server IP must be entered in this dialog, for example, 192.168.22.99. If you do not receive a dynamic name server assignment, enter the IP addresses of the name servers of your provider here. Also set the time after which the connection should be terminated automatically if no data exchange has occurred. Finally, confirm your settings with to continue to the overview of the configured interfaces. Activate your settings with .