| SUSE LINUX – User Guide Part II. Configuration / Chapter 5. The KDE Desktop | ||||
|---|---|---|---|---|
 | 4.10. YaST2 in Text Mode (ncurses) | 5.2. Settings |  | |
| SUSE LINUX – User Guide Part II. Configuration / Chapter 5. The KDE Desktop | ||||
|---|---|---|---|---|
| 4.10. YaST2 in Text Mode (ncurses) | 5.2. Settings | | |
Table of Contents
Abstract
KDE is the default desktop in a standard installation of SUSE LINUX. It is easy to use and highly configurable. The following sections introduce the basic desktop and customization of the desktop. Konqueror is essential for file management. A number of additional applications are also described.
The graphical desktop environment should not pose any problems for former Windows or Macintosh users. The main components are the icons on the desktop and the panel at the bottom of the screen. The mouse is your most important tool. Click a symbol or an icon once to start the associated program or the file manager Konqueror. If you right-click an icon, different menus appear, depending on the program. As well as the icons, there are two desktop menus.
If you middle-click the desktop (if your mouse only has two buttons, press both buttons at the same time), a window and desktop management menu are displayed. If you keep the mouse button pressed, select a menu item directly. Alternatively, release the mouse button and click the respective menu item.
If you have several windows on your desktop, they are placed next to each other and aligned with the top left corner.
Starting from the top left corner, the windows on the desktop are placed on top of each other in such a way that only the top and left borders of the lower windows are visible.
Desktop 1 is your default desktop. All open windows are listed under this menu item. Click windows to move them to the foreground.
You can use additional virtual desktops. Switch to another desktop with the menu or the panel. All functions are available on all desktops. This limits the number of programs and associated windows that need to be arranged on one desktop. These virtual desktops resemble additional desks in your office.
If you right-click the desktop, a more complex menu is displayed, allowing you to customize your desktop.
Enables creation of new elements, such as directories, files, or URLs, on the desktop. A list of possible elements is provided for selection in a submenu.
This item opens the bookmark editor KEditBookmarks. With it, create, group, change, or delete bookmarks. The browser and file manager Konqueror can access these bookmarks.
This option allows you to undo the last action. For example, if you just created a new directory on the desktop, clicking this item reverts the creation so the directory disappears.
To have a desktop icon for a folder or document, copy the icon from the file manager by right-clicking and selecting then moving the mouse to the desired location on the desktop. Right-click again and select . The icon is now available on your desktop and can be moved around by dragging it with the left mouse button pressed.
Rearranges the symbols on the desktop. You can also change the order of the icons.
The windows on the desktop are either placed on top of each other at the top left corner or next to each other.
This menu item starts a configuration dialog with which to configure the appearance of the desktop. Details about the configuration of the desktop are provided in Section 5.2. “Settings”.
Use this submenu to open the KDE manual or write a bug report to the developers via the KDE web site. You can also start an information page about KDE.
If you leave your workstation and do not log out, you should use this function to prevent others from gaining access to your files. Depending on the setting, the screen either turns black or a screensaver starts. To continue using the computer, enter your password.
Log out from your system if you are not going to use the system for some time.
The trash bin is a directory for files marked for deletion. Drag icons from the file manager or the desktop to the trash bin icon by keeping the left mouse button pressed then release to drop them there. Alternatively, right-click an icon and select from the menu. Click the trash bin icon to view its contents. You can retrieve an item from the trash if desired.
Files removed with are not moved to the trash bin, but deleted completely. To delete the files in the trash bin completely, right-click the trash bin icon and select .
If you click the floppy disk icon when a floppy disk is inserted, the file manager starts and displays the content of the floppy disk. Display a context menu with various options by right-clicking the individual icons on the floppy disk. It is also possible to move the icon to a different location, such as the desktop or your home directory, by simply keeping the left mouse button pressed and dragging it to the appropriate icon. You will be asked whether you want to move or copy the file or create a link. You can also copy or move files from your home directory to the floppy disk.
Right-click the floppy disk icon to access the context menu. is a very important option. Be sure to unmount the drive before removing a floppy disk from the drive, as this is necessary to trigger the actual writing of the data to the floppy disk.
The handling of CDs and DVDs is similar, with the only difference that these media are not writable. Nevertheless, you must unmount CD and DVD drives, because otherwise you will not be able to eject the CD. You can also select , which causes the medium to be unmounted and ejected. Both methods only work if the CD or DVD is no longer accessed and any file manager window displaying the content of the CD or DVD has been closed.
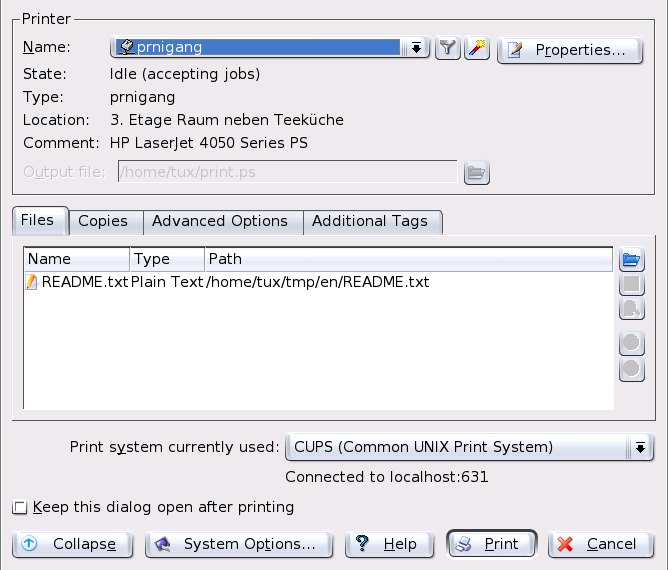
Click the printer icon on the desktop to start KPrinter. This program enables you to adjust a number of settings and send print jobs directly. The upper part of the main window, like that in Figure 5.1. “The Main Window of KPrinter”, shows the selected printer and allows selection of a different printer. Click the black arrow next to the printer name to display a list of all available printers and select the desired printer.
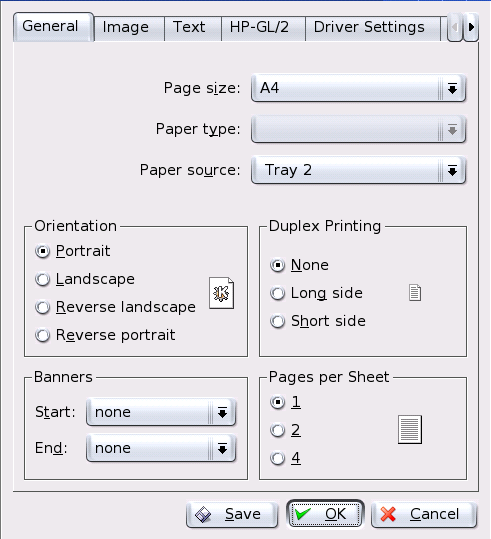
To configure the selected printer, click . A configuration dialog like that shown in Figure 5.2. “Settings in KPrinter” opens, enabling you to change the paper format (e.g., from A4 to letter) or change between multiple paper trays. The latter is especially useful if one of the trays contains letterhead paper and another contains plain white paper.
Under , choose between and . To the right of , specify the settings for two-sided printing. If is selected, only one page is printed per sheet. If you click the circle preceding , the front and back will be printed like in a book. With , the back is printed reversely and you have to turn the sheet up to view the text correctly. Under , mark your document with headlines and subtitles, such as “confidential” or “secret”. Under , select to print two or four pages on one sheet. For this purpose, the pages are downsized accordingly. If you click , your settings are adopted for other print jobs, too. However, if you click , the settings only apply to the current job. If you terminate the dialog with , all changes are discarded.
After making all settings, click . The second part of the window now becomes visible. Click the blue folder icon. By default, your home directory is displayed. Select a file and confirm with . You can also select the file by double-clicking it. The respective file then appears in the overview of the main window, together with the name, type, and path specification. Now click to send the job to the printer. The job is placed in the queue and can be monitored with KJobViewer. On the other hand, if you click the document, two additional buttons become active to the right. Use the X button to remove the document from the selection or use the magnifying glass icon to display, edit, and save the file with Kwrite or OpenOffice.org (depending on the document type). Afterwards, simply close the editing program and click in the KPrinter dialog. Your changes are then adopted for printing.
All KDE applications use KPrinter for printing. For example, if you click the printer icon in KWrite, the KPrinter dialog appears. The file to print is already preselected.
The panel at the lower edge of the screen consists of several areas. By default, the icon for the main menu is located to the far left. Other icons are lined up alongside it. The house icon provides quick access to your home directory with all subdirectories. The other icons start applications, such as OpenOffice.org, K-Mail, and the web browser Konqueror, if these programs were installed.
Next to these icons are the numbered buttons with which to switch desktops. These multiple desktops enable you to organize your work if you use many programs simultaneously, as if you had several desks for various tasks.
The taskbar is located next to the virtual desktops. All started applications are displayed in the taskbar. If you click a window title in the taskbar, the application is moved to the foreground. If it is already in the foreground, clicking minimizes the application. If you click it again, it reopens. Next to the taskbar, find applets, such as the clipboard Klipper, SuSEwatcher, and any other applets you have started. The clock helps you keep track of the time.
If you right-click an empty space in the panel, a menu providing the usual help and configuration options for the panel is displayed. Use the menu to change the size of the panel and add and remove applications. To add an application, search for the respective application in the menu and select it. Remove applications or applets by right-clicking the corresponding icon and selecting from the displayed menu.
Access the main menu by means of the icon to the far left of the panel. By default, this menu contains entries for logging out from the system, locking the screen, executing commands, and starting the quick browser and the bookmark manager. Use the file manager to display your home directory, search for files, or start the Control Center for the purpose of customizing the desktop. The other menu entries allow you to start a variety of programs sorted by subjects. The following section provides information about selected functions that you can start by means of the main menu. Detailed information about the Control Center is available in Section 5.2. “Settings”.
You can log out from the system by means of this menu item. However, first you will be asked what should happen after the logout. If you select the , the login screen is displayed, allowing you or another user to log in to the system. You can also turn off or restart the computer. Confirm your selection with or remain logged in by clicking .
If you leave your workstation, you can blacken your screen or start a screensaver. To restore the session view, enter your normal login password. In this way, make sure no one reads or manipulates your documents or e-mail messages.
To start a second session with a graphical user interface on your machine, select from the main menu. Your current session remains active while you are taken to the login screen. Log in. You can also start another window manager. Access the first session by pressing Ctrl-Alt-F7. Press F8 instead of F7 to access the new session. Additional sessions can be accessed by pressing Ctrl-Alt-F9 to F12.
Enter a command in the dialog that opens. In this way, easily start applications whose name you know without having to navigate through the menu.
By way of this menu, start the bookmark editor with to manage your bookmarks. If you select a bookmark from the menu, the browser starts and loads the desired URL.
starts the program KFind. Use to access the program manual, which provides information about all details. If you forget where a certain file is, enter it in the field and start a search in your home directory. This default setting can be changed to a different directory, such as Documents, by clicking . If you are not sure what the exact file name is, use wild cards. If you can remember that the file name contains the character string blubb, simply enter *blubb*. This tells the program that blubb can be preceded and followed by any characters.
Use the tabs at the top left of the window to change to and . In , use to limit the search to files or directories or search for the content of the document. If you enter a keyword of the document to find in , all texts containing this word are displayed. Click the desired file to load it directly.
With , save the file under a new name in a different directory. The original file is retained.
Search criteria can be specified in the dialog. You can limit your search to files that were modified or created recently or to files that belong to a specific user or group.
The windows of all KDE applications have the same structure. The title bar features four buttons in the right corner. The question mark provides access to context help. If you click the question mark then an icon of the application, a short help text is displayed. The button with the black dash minimizes the window. A minimized window is placed in the panel but not terminated. Display it and continue to use it by clicking the icon in the taskbar. The button with the square maximizes the window over the entire screen area. Another click on this symbol restores the window to its former size. The X closes the window and terminates the application.
Windows can be moved, enlarged, or downsized. Click the title bar and keep the left mouse button pressed to move the window on your screen. If you right-click the top bar, a configuration menu is displayed. To change the size of the window, move the mouse pointer along one of the four edges of the window until the mouse pointer symbol changes to a double arrow. Then keep the left mouse button pressed while moving this edge. Another possibility is to move the mouse pointer to one of the four corners and resize two edges of the window at the same time.