| SUSE LINUX – User Guide Chapter 19. Sound in Linux / 19.2. Mixers | ||||
|---|---|---|---|---|
 | Chapter 19. Sound in Linux | 19.3. Players |  | |
| SUSE LINUX – User Guide Chapter 19. Sound in Linux / 19.2. Mixers | ||||
|---|---|---|---|---|
| Chapter 19. Sound in Linux | 19.3. Players | | |
Mixers provide a convenient means of controlling the volume and balance of the sound output and input of computers. The main difference between the various mixers consists in the outer appearance of the user interface. Select one that best suits your needs.
![[Tip]](admon/tip.png) | Tip |
|---|---|
Generally, it is advisable to open a mixer application prior to opening other sound applications. Use the mixer to test and adjust the control settings for the input and output of the sound card. Some sound cards may not allow simultaneous access from multiple applications. If a sound application freezes, this might be the cause. | |
If you have multiple sound cards, gamix provides a set of controllers for each card. Slide the control sliders to set the levels as desired.
QAMix is a mixer with a QT interface. If necessary, the application interface can be configured in a flexible way in an XML file. All parameters can be controlled via MIDI. On start-up, the application first searches the directory ~/.qamix for an XML file corresponding to the name of the ALSA driver of your sound card. If such a file does not exist, it searches the same directory for the file default.xml. If this file does not exist either, the program continues its search in the directory /usr/share/qamix.
If you have several sound cards, select the desired card with the parameter -c. hw:0 stands for the first sound card, hw:1 for the second, and so on. The parameter -g can be used to specify a file for the XML description of the application interface explicitly. Detailed information about the XML format is available in the directory /usr/share/doc/packages/qamix.
KMix is the KDE mixer. It provides a convenient and familiar interface for KDE users. It can also be integrated into the KDE panel.
If you use GNOME, the GNOME Mixer appler can added to the panel for convenient volume control. Simply right-click the panel then select -> -> . Right-click the volume control applet then select to access the more advanced mixer functions.
alsamixer can be run from the command line without the X environment. The application is operated with the cursor keys. Use Q, W, E, Y, X, and C to set different levels for the left and right channels. M mutes single channels. In this case, appears above the muted controller. To terminate alsamixer, press Esc.
The basic controls for sound output are , , and . sets the master volume. and control the respective weighting of the PCM and audio CD channels.
Determine the recording source by pressing Space. The controller regulates the input amplifier. Whether the controller or the controller is used depends on the recording source.
For more information, enter man alsamixer. alsamixergui is a mouse-operated variant of alsamixer with a graphical interface.
![[Important]](admon/important.png) | Important |
|---|---|
The look and feel of alsamixer depends on the type of sound card used. The description referred to the AC97 standard for mixer functionality. If your sound card does not comply with this standard, some features may not be supported. The mixer Envy24 should be used for sound cards equipped with the Envy24 (ice1712) chip (see Section 19.2.7. “The Mixer for the Sound Chip Envy24”). | |
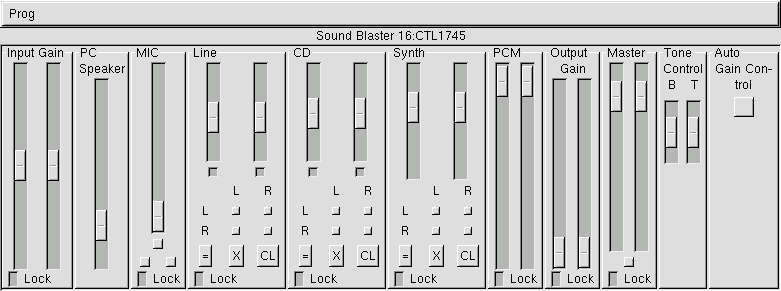
Apart from the parameters of the standard, there are many additional options for Soundblaster Live! and Audigy cards. The controls , , and are used for playback. can be used to adjust the level of the mix. This mix also receives input from the , , and signals. adjusts the level of the PCM channels. controls the volume of the internal wavetable synthesis of MIDI data.
Apart from the parameter for recordings, the control is used to control the level of the recording sources. Furthermore, and can be selected as recording source. This internal loopback capture can be activatedin the standard by selecting the control as recording source.
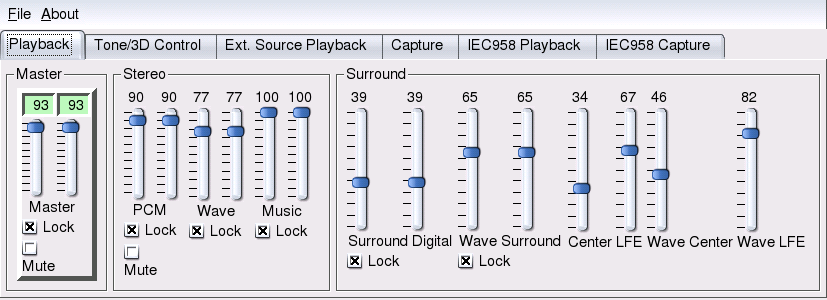
envy24control is a mixer application for sound cards using the Envy24 (ice1712) chip. Start this mixer with -> -> or from the command line with envy24control &. The flexibility of the Envy24 chip can result in varying functionalities in different sound cards. The latest details on this sound chip are available in /usr/share/doc/packages/alsa/alsa-tools/envy24control.
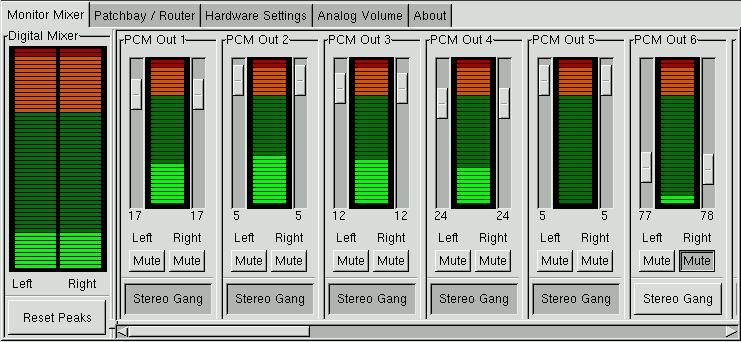
The of envy24control shows the signal levels that can be mixed digitally in the sound card. The signals designated as are generated by applications that send PCM data to the sound card. The signals of the analog inputs are shown under . The inputs are shown to the right. The input and output levels of the analog channels must be set under .
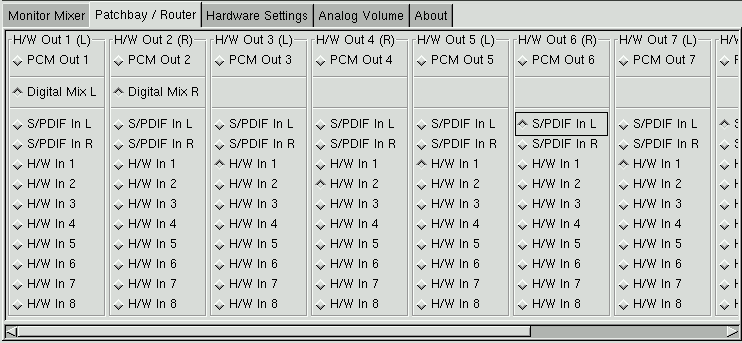
Use the sliders for digital mixing. The respective levels are displayed in the . For each output channel, the contains a row of radio buttons for selecting the desired channel source.
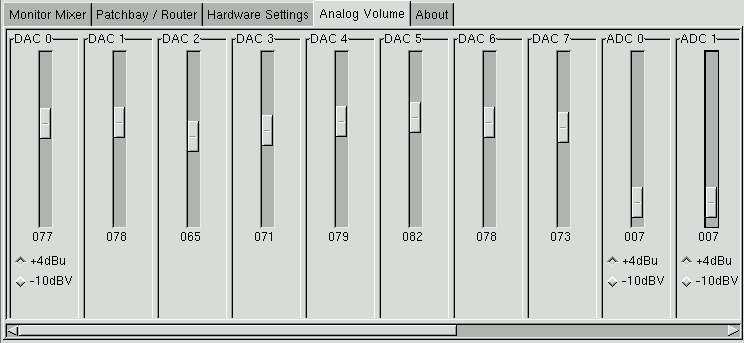
Adjust the amplification for the analog-to-digital and digital-to-analog converters under . The sliders are used for the output channels and the sliders are used for the input channels. Use the radio buttons to switch the levels between +4 dBu and -10 dBV. The first setting is intended for audio professionals. The latter is for private purposes.