| SUSE LINUX – User Guide Chapter 14. ISDN Telecommunication / 14.2. Usage | ||||
|---|---|---|---|---|
 | Chapter 14. ISDN Telecommunication | Part IV. Multimedia |  | |
| SUSE LINUX – User Guide Chapter 14. ISDN Telecommunication / 14.2. Usage | ||||
|---|---|---|---|---|
| Chapter 14. ISDN Telecommunication | Part IV. Multimedia | | |
The following section briefly describes the use of the system. Following a short introduction to the reception of messages with the Linux mail system, a description is provided for the operation of the fax functionality and the answering machine.
The development of CapiSuite heavily relied on using already existing capabilities of Linux. This is why the delivery of incoming faxes and voice messages is handled by the internal Linux mail system instead of proprietary applications and protocols. This requires the configuration of a mail client for receiving local messages for each user of CapiSuite.
If you have not disabled the sending of mail in the CapiSuite configuration, you will receive all incoming voice and fax messages in your e-mail program, where you can view them or listen to them as usual.
No further instructions are necessary for receiving fax messages. As soon as a fax is received for a number assigned to a user, the message is stored in the system and delivered to the user as an e-mail with a PDF attachment. PDF is a common exchange format for documents and can be read in virtually all operating systems with Acrobat Reader from Adobe.
For backup purposes, every document received is also stored on the hard disk in /var/spool/capisuite/users/<username>/received/. This directory can be accessed if anything goes wrong during the e-mail transmission of if an e-mail message was accidentally deleted. More information can be found in the CapiSuite documentation in /usr/share/doc/packages/capisuite/manual/index.html.
The command line tool capisuitefax is available for sending faxes. It accepts one or more target fax numbers and one or more documents in the PostScript format. This format is generated by most Linux applications when printing to a file.
capisuitefax supports parameters such as the following:
Returns a short summary of valid parameters.
This parameter declares the target number to which the fax should be sent.
capisuitefax usually generates a few informative messages. This option suppresses this and only allows the display of possible error messages.
The following command would send the two documents document1.ps and document2.ps to the target number 089123456:
capisuitefax -d 089123456 document1.ps
    document2.ps
capisuitefax converts the documents to the correct format and stores them together with a description file in a special folder from which they are then fetched and sent by CapiSuite. There can be a short delay between the execution of the command and the actual sending. The user is notified by e-mail when a fax message has been successfully sent or after the failure of a set number of attempts.
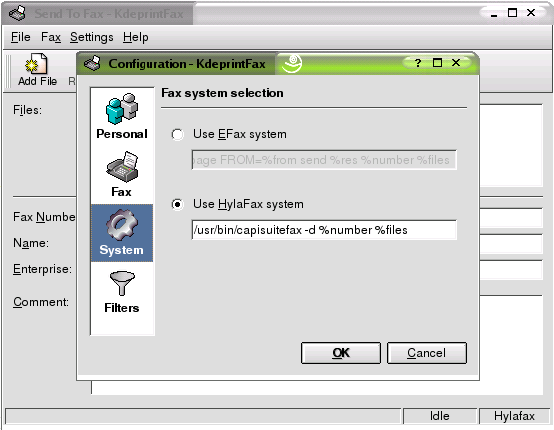
In the standard desktop KDE, fax messages can easily be sent from any KDE application with the help of the KDEPrintFax utility. Configure KDEPrintFax as follows:
Start KDEPrintFax. This can be done by pressing Alt-F2 and entering kdeprintfax.
Select +.
Click the icon in the left pane.
As capisuitefax is largely compatible with the HylaFAX suite, select HylaFAX under .
Set to /usr/bin/capisuitefax -d %number %files.
Finish the configuration by clicking and closing KDEPrintFax.
is then available in the menu of any KDE application. Selecting it starts KDEPrintFax, which requests the target phone number and sends the fax.
Non-KDE applications can also use this function if their print command can be set manually. In this case, replace lpr with kprinter. When you print a document, the KDE print menu will be displayed along with the possibility to transmit fax messages.
![[Warning]](admon/warning.png) | Warning |
|---|---|
To date, capisuitefax does not support the full range of HylaFAX features. Thus, features such as the resolution settings are currently ignored. | |
If e-mail transmission was not deactivated, voice messages left on the answering machine are sent by e-mail to the recipient associated with the dialed phone number. Thus, the operation of the answering machine does not require any additional description. All incoming messages can be received and opened in the e-mail client. For backup purposes, the incoming messages are also stored in /var/spool/capisuite/users/username/received/.
The recording of the personal welcome message is performed directly over the remote access feature of the answering machine. To access your answering machine remotely, call your associated number from any telephone. Enter the previously-defined PIN during the welcome message playback. Wait a few seconds if you mistype your PIN then try again after the beep. Shortly after having correctly entered the PIN, the answering machine gives the number of stored messages. You then have the choice of recording a new welcome message or listening to your stored messages. Follow the instructions given.
The following table provides a brief overview of the menu items for remotely accessing messages. It is recommended to carry a copy of it if you use the remote access frequently. The commands can be entered at any time during the playback of the messages. This means that an excessively long voice message can be skipped easily.
Table 14.1. Commands for Message Playback
| Key | Function |
|---|---|
| 1 | delete current message |
| 4 | skip to the next message |
| 5 | skip to the previous message |
| 6 | replay current message |