Chapter 2. System Configuration with YaST / 2.7. System | ||||
|---|---|---|---|---|
 | 2.6. Security and Users | 2.8. Miscellaneous |  | |
Chapter 2. System Configuration with YaST / 2.7. System | ||||
|---|---|---|---|---|
| 2.6. Security and Users | 2.8. Miscellaneous | | |
The YaST backup module enables you to create a backup of your system. The backup created by the module does not include the entire system. It only saves information about changed packages and copies of critical storage areas and configuration files.
Define the kind of data to save in the backup. By default, the backup
includes information about any packages changed since the last
installation. In addition, it may include data that does not belong to
packages themselves, such as many of the configuration files in
/etc or the directories under
/home. Apart from that, the backup can include
important storage areas on your hard disk that may be crucial when
trying to restore a system, such as the partition table or the master
boot record (MBR).
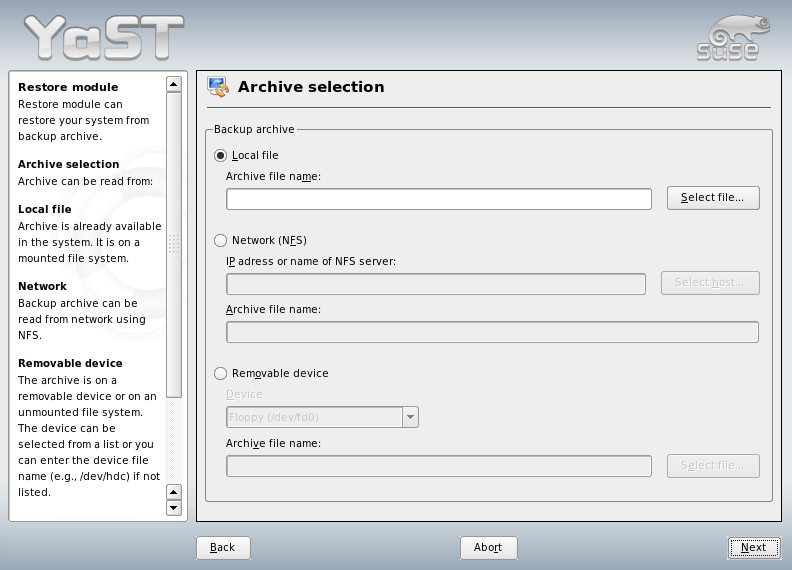
The restore module, shown in Figure 2.10, “Start Window of the Restore Module”, enables restoration of your system from a backup archive. Follow the instructions in YaST. Press to proceed to the individual dialogs. First, specify where the archives are located (removable media, local hard disks, or network file systems). A description and the contents of the individual archives are displayed, enabling you to decide what to restore from the archives.
Additionally, there is a dialog for uninstalling packages that were added since the last backup and one for reinstalling packages that were deleted since the last backup. These two steps enable you to restore the exact system state at the time of the last backup.
![[Warning]](admon/warning.png) | System Restoration |
|---|---|
Because this module normally installs, replaces, or uninstalls many packages and files, use it only if you have experience with backups. Otherwise you may lose data. | |
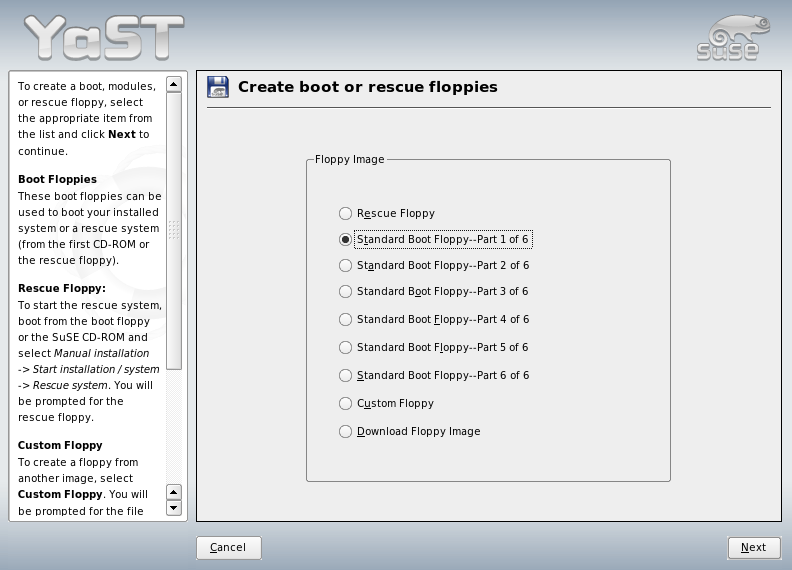
Use this YaST module to create boot and rescue disks. These floppy disks are helpful if the boot configuration of your system is damaged. The rescue disk is especially necessary if the file system of the root partition is damaged.
The following options are available:
Use this option to create the standard boot floppies with which to boot an installed system. Depending on the architecture, the actual number of boot disks may vary, but you should create all the boot disks presented in the dialog because all these disks are necessary for booting. They are also needed for starting the rescue system.
This disk contains a special environment that allows you to perform maintenance tasks in your installed system, such as checking and repairing the file system and updating the boot loader. To start the rescue system, boot with the standard boot disks then select ++. You will then be prompted to insert the rescue disk.
Use this to write any existing floppy disk image from the hard disk to a floppy disk.
With this, enter a URL and authentication data to download a floppy disk image from the Internet.
To create one of these floppy disks, select the corresponding option and click . Insert a floppy disk when prompted. If you click again, the floppy disk is created.
The logical volume manager (LVM) is a tool for custom partitioning of hard disks with logical drives. More information about LVM is available in Section 3.7, “LVM Configuration”.
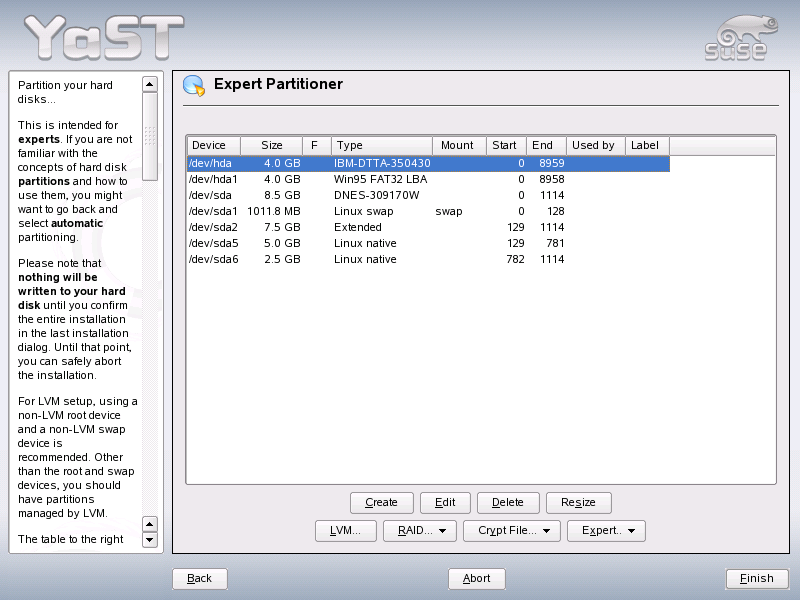
With the expert dialog, shown in Figure 2.12, “The YaST Expert Partitioner”, manually modify the partitioning of one or several hard disks. Partitions can be added, deleted, and edited. Also access the soft RAID and LVM configuration from this YaST module.
| Warning |
|---|---|
Although it is possible to modify the partitions in the installed system, this should be handled only by experts. Otherwise the risk of losing data is very high in case of a mistake. If you repartition a hard disk in use, reboot the system right afterwards. It is safer to use the rescue system than repartitioning the system while running. | |
All existing or suggested partitions on all connected hard disks are
displayed in the list of the expert dialog. Entire hard disks are listed as
devices without numbers, such as /dev/hda or
/dev/sda. Partitions are
listed as parts of these devices, such as /dev/hda1 or
/dev/sda1. The size, type,
file system, and mount point of the hard disks and their partitions are also
displayed. The mount point describes where the partition is mounted in the
Linux file system tree.
If you run the expert dialog during installation, any free hard disk space is also listed and automatically selected. To provide more disk space to SUSE LINUX, free the needed space starting from the bottom toward the top of the list (starting from the last partition of a hard disk toward the first). For example, if you have three partitions, you cannot use the second exclusively for SUSE LINUX and retain the third and first for other operating systems.
Select . If several hard disks are connected, a selection dialog appears in which to select a hard disk for the new partition. Then, specify the partition type (primary or extended). Create up to four primary partitions or up to three primary partitions and one extended partition. Within the extended partition, create several logical partitions (see Section 1.5.4.1, “Partition Types”).
Select the file system to use and a mount point, if necessary. YaST suggests a mount point for each partition created. Details of the parameters are provided in the next section. Select to apply your changes. The new partition is then listed in the partition table. If you click , the current values are adopted. During installation you are then returned to the suggestion screen.
If you create a new partition or modify an existing partition, various parameters can be set. For new partitions, suitable parameters are set by YaST and usually do not require any modification. To perform manual settings, proceed as follows:
Select the partition.
the partition and set the parameters:
Even if you do not want to format the partition at this stage, assign it a file system ID to ensure that the partition is registered correctly. Possible values include , , , and . For details on LVM and RAID, refer to Section 3.7, “LVM Configuration” and Section 3.8, “Soft RAID Configuration”.
To format the partition immediately within the scope of the installation, specify one of the following file systems for the partition: , , , , or . Refer to Chapter 20, File Systems in Linux for details on the various file systems.
Swap is a special format that allows the partition to be used as virtual memory. ReiserFS is the default file system for the Linux partitions. ReiserFS, JFS, and Ext3 are journaling file systems. These file systems are able to restore the system very quickly after a system crash, because write processes are logged during the operation. Furthermore, ReiserFS is very fast in handling lots of small files. Ext2 is not a journaling file system. However, it is rock solid and good for smaller partitions, because it does not require too much disk space for management.
Set various parameters for the selected file system here. Depending on the file system used, various options are offered for experts.
If you activate the encryption, all data is written to the hard disk in encrypted form. This increases the security of sensitive data, but slightly reduces the system speed, because the encryption takes some time. More information about the encryption of file systems is provided in Section 34.3, “Encrypting Partitions and Files”.
Here, specify various parameters for the administration file of the
file systems (/etc/fstab).
Specifies the directory at which the partition should be mounted in the file system tree. Select from various YaST proposals or specify any other name.
Select to activate the partition.
If you partition manually, create a swap partition of at least 256 MB. The swap partition is used to free the main memory of data that is not used at the present moment. This keeps the main memory free for the most frequently-used important data.
opens a menu containing the following commands:
Rereads the partitioning from disk. For example, you need this after manual partitioning in the text console.
This completely overwrites the old partition table. For example, this can be helpful if you have problems with unconventional disk labels. Using this method, all data on the hard disk is lost.
If the partitioning is performed by YaST and other partitions are detected
in the system, these partitions are also entered in the file
/etc/fstab
to enable easy access to this data. This file contains all
partitions in the system with their properties, such as the file system,
mount point, and user permissions.
Example 2.1. /etc/fstab: Partition Data
    /dev/sda1    /data1    auto      noauto,user 0 0
    /dev/sda5    /data2    auto      noauto,user 0 0
    /dev/sda6    /data3    auto      noauto,user 0 0
The partitions, regardless of whether they are Linux or FAT partitions, are
specified with the options noauto and
user. This allows any user to mount or unmount these
partitions as needed. For security reasons, YaST does not automatically
enter the exec option here, which is needed for executing
programs from the location. However, to run programs from there, you can
enter this option manually.
This measure is necessary if you encounter system messages
such as bad interpreter or Permission denied.
From the expert partitioner, access the LVM configuration with (see Section 3.7, “LVM Configuration”). However, if a working LVM configuration already exists on your system, it is automatically activated as soon as you enter the LVM configuration for the first time in a session. In this case, any disks containing a partition belonging to an activated volume group cannot be repartitioned because the Linux kernel cannot reread the modified partition table of a hard disk when any partition on this disk is in use. However, if you already have a functioning LVM configuration on your system, physical repartitioning should not be necessary. Instead, change the configuration of the logical volumes.
At the beginning of the physical volumes (PVs), information about the volume
is written to the partition. In this way, a PV “knows” to which
volume group it belongs. To reuse such a partiton for other non-LVM
purposes, it is advisable to delete the beginning of this volume. For
example, in the VG system and PV
/dev/sda2, this can be done with the command
dd if=/dev/zero of=/dev/sda2 bs=512
count=1.
| File System for Booting |
|---|---|
The file system used for booting (the root file system or
| |
The SCPM (system configuration profile management) module offers the possibility of creating, managing, and switching among system configurations. This is especially useful for mobile computers that are used in different locations (in different networks) and by different users. Nevertheless, this feature is useful even for stationary machines, because it enables the use of various hardware components or test configurations. For more information about SCPM basics and handling, refer to Chapter 15, System Configuration Profile Management.
SUSE LINUX can be operated in several runlevels. By default, the system boots to runlevel 5, which offers multiuser mode, network access, and the graphical user interface (X Window System). The other runlevels offer multiuser mode with network but without X (runlevel 3), multiuser mode without network (runlevel 2), single-user mode (runlevel 1 and S), system halt (runlevel 0), and system reboot (runlevel 6).
The various runlevels are useful if problems are encountered in connection with a particular service (X or network) in a higher runlevel. In this case, the system can be booted to a lower runlevel to repair the service. Many servers operate without a graphical user interface and must be booted in a runlevel without X, such as runlevel 3.
Usually you only need the standard runlevel (5). However, if the graphical user interface freezes at any time, you can restart the X Window system by switching to a text console with Ctrl-Alt-F1, logging in as root, and switching to runlevel 3 with the command init 3. This shuts down your X Window System, leaving you with a text console. To restart the graphical system, enter init 5.
For more information about the runlevels in SUSE LINUX and a description of the YaST runlevel editor, refer to Chapter 7, Booting and Configuring a Linux System.
The directory /etc/sysconfig contains the files
with the most important settings for SUSE LINUX. The sysconfig editor
displays all settings in a well-arranged form. The values can be
modified and saved to the individual configuration files. Generally,
manual editing is not necessary, because the files are automatically
adapted when a package is installed or a service is configured. More
information about /etc/sysconfig
and the YaST sysconfig editor is available in
Chapter 7, Booting and Configuring a Linux System.