

Table of Contents
Chapter 1. Some useful commands
Table of Contents
This section introduces a number of commands above the introductory set you already know and goes into greater depth with some commands you should have already met.
Using the locate command
The locate program is used to find files of a certain
name on the system. Suppose that on the
system—somewhere—you knew there was a file called
rpmrc but you couldn't remember where. Running the command
“locate rpmrc” will locate all the
files on the system with “rpmrc” in their
names.
The locate program doesn't scan the system every time you make a query, of course. Once a night a single sweep of the system is performed which creates a database of filenames. It is this database that is searched.
By default, locate will list any file or directory which
has its search string within it. You can use
“/” within the search string to identify
directories. The program can generate huge amounts of output and
its output is often piped into grep for more refined
searching.
Figure 1.1. Example: Using the locate command
$locate rpmrc
/usr/lib/rpm/convertrpmrc.sh
/usr/lib/rpm/rpmrc
/usr/share/gnorpmrc
/usr/share/gnorpmrc.ko
Using the find command
The locate program uses a database to avoid searching the directory hierarchy every time it is called. A program that does walk over an entire directory tree (and potentially the whole file system) is find. This command runs over a directory tree looking at each file and directory in turn and applies a series of tests to them. The final “test” is typically either “print the file's name” or “execute this command on the file”.
If we run the command find . -print then,
starting with the current directory (“.”),
find will run through the entire directory tree and print
the name of every file and directory it comes across.
Figure 1.2. Simple uses of find—1
$find . -print
$ find . -type d -print
A simple test that find offers is on the type of the
file. If we run the command find .-type d -print
then find runs through every file and directory under the
current working directory and on each one it runs the test
“-type d” which means “is it a
directory?” If the object in question is not a directory then
the processing of that node in the filesystem stops immediately and
find moves on to the next in its list. It is is a directory
then find moves on to its next test, which is the
pseudo-test “-print” in this case, so it
prints the name of the node. What this does it to find and print
the names of all directories at or below the current one.
A similar test checks the name of a node in the file system
against a shell-style regular expression. If we run the command
find . -name '[A-Z]*' -print then any node below
the current working directory will be checked to see if its name
starts with a capital letter. If it does then it will be printed.
We can combine tests to find just the directories below the current
working directory that begin with a capital.
Note the use of the single quotes around the regular expression. These stop the shell expanding the expression into a list of the matching files in the current working directory and allow it to be passed unexpanded into find.
Figure 1.3. Simple uses of find—2
find . -name '[A-Z]*' -print

find . -type d -name '[A-Z]*' -print

find . -type d -name '*.ps' -print
In addition to just printing a node's name it is also possible
to get find to run a command on the matching node with the
-exec option. Its syntax is rather baroque, though.
Suppose we want to run “wc -l” on
every file that ends in “.ps”. The command we
need to run is this: find . -name '*.ps' -exec wc -l {}
\;
The bizarre hieroglyphs after the -exec demand some
explanation. Immediately following the option is the command to be
run, with any options it might have itself. Within these options
the token “{}” is expanded into the full
filename that has been matched and the “\;”
marks the end of the command. Note that the space before the
“\;” must be there.
Figure 1.4. Applying a command to every plain file
find . -type f -exec wc -l {} \;
Using the ps command
This course assumes you already have some basic knowledge of the ps command. The ps program has just a few options that you actually use from day to day. It has many, many other options that you might use once in your life or in the middle of a particular shell script. The options we will consider can be split into two classes: process selection options, controlling which processes should be reported on, and display formatting options which control how the data about the selected processes should be displayed.
ps: Process selection options
-
-e: Every process
-
-Uuser: Processes owned byuser
-
-Ggroup: Processes owned bygroup
-
-ppid1, pid2, pid3:Processes with IDspid1 pid2 or pid3
The quickest way to get lots of data about the processes of
interest is to request “full” output with the
-f option. This gives the user, process ID, parent process
ID, start time, controlling terminal, CPU time used and command
arguments. It is typically more useful than the “long”
option. In theory, the “full” output gives the user all
the information he or she could want and the “long”
output gives all the system
data about the process.
ps: Simple output formatting
-
-f: “Full” output
-
-l: “Long” output
-
--forest: “Tree” format
-
-h: Suppress column headers
If you need particular bits of information, you should consider
using the -o option to specify exactly whick output
columns you want.
Figure 1.5. ps: Fine tuning the output
$ ps -U user -o pid,ppid,cmd
  PID  PPID CMD
11985 11072 fvwm2
12012 11985 /usr/X11R6/lib/X11/fvwm2/FvwmButtons 8 5 /etc/X11/fvwm2/system.fv
12014 11985 /usr/X11R6/lib/X11/fvwm2/FvwmIconMan 10 5 /etc/X11/fvwm2/system.f
12015 11985 /usr/X11R6/lib/X11/fvwm2/FvwmPager 12 5 /etc/X11/fvwm2/system.fvw
12016 11985 xclock -bg bisque3 -fg black -hd black -hl black -padding 0 -upda
ps: Useful arguments to -o
-
args: the arguments of the command (including the command)
-
cmd: the command
-
pcpu: percentage of CPU currently used
-
time: CPU time used so far
-
pmem: percentage of memory currently used
-
rss: resident set size
-
user: user
-
uid: numeric user ID
-
group: group
-
gid: numeric group ID
-
pid: process ID
-
ppid: parent process ID
-
tty: controlling terminal
-
stime: start time
Figure 1.6. Exercise: ps format options
-
Run the command
ps -lf -Uyourself. -
Decide which columns are most useful and/or interesting.
-
Construct a
ps -ocommand to show just those columns.
Chapter 2. Some shell features
Table of Contents
Red Hat Linux ships with bash (the ‘Bourne Again SHell’) as its default shell. This has a number of features to make interactive use simpler.
Tab completion
Figure 2.1. Demonstrating bash
-
Launch an xterm.
-
Change directory to
${UX}/Lessons/FurtherUnix/bashdemo.
-
Run
ls
-l
.
The first useful feature is called “Tab completion” and saves the user having to type entire file names. This will become very useful in the package management section where some of the filenames are very long indeed.
Figure 2.2. Tab completion—1
-
Type:
ls -l xy-
Do not press the Return key.
-
Do not leave any trailing spaces.
-
Do not press the Return key.
-
Press the Tab key.
-
Observe how the file name is completed for you.
-
Observe how the file name is completed for you.
-
Press Return to issue the instruction.
Figure 2.3. Tab completion—2
-
Type
ls -l a
(No Return, no trailing space.)
-
Press the Tab key.
-
Observe how the file name is completed to
abc.
-
Observe how the file name is completed to
-
Type “
1”. (No Return, no trailing space.)
-
Press the Tab key again.
-
Observe how the file name is fully completed.
-
Observe how the file name is fully completed.
Figure 2.4. Tab completion—3
-
Type
ls -l p
(No Return, no trailing space.)
-
Press the Tab key.
-
Observe how the directory name is completed to
pqr789/.
-
Observe how the directory name is completed to
-
Type “
a”
(No Return, no trailing space.)
-
Press the Tab key.
-
Observe how the file name is completed.
-
Observe how the file name is completed.
Figure 2.5. Tab completion—4
-
Type
ls -l a
(No Return, no trailing space.) -
Press the Tab key.
-
Observe how the file name is completed to
abc.
-
Observe how the file name is completed to
-
Press the Tab key quickly.
-
Observe how a list of possible completions is offered.
- Note that the partial command line is repeated.
-
Observe how a list of possible completions is offered.
A simple history mechanism
The next useful feature bash offers is called a history mechanism allowing access to previously typed commands. There are two such mechanisms built into bash. We will deal with the simpler first.
If you hit the up arrow on your keyboard (not the one that's part of your numeric keypad) you should see your previous commands appear at the shell prompt. You can hit Return after any of them and they will be executed. You need to be slightly careful because you can change directory somewhere in your command history and any command you scroll back to will be run in your current directory rather than in the directory it was previously run in. Sometimes this is what you want; sometimes it isn't.
It is also possible to earch for a previously issued command. If
you hit Ctrl-R the shell prompts you for a search
string with the prompt “(reverse-i-search)`'”.
As you type, the shell searches backwards through its history for
the most recently issued command with the string you have typed in.
This is incremental searching; as you type each letter the
most recent matching command (being displayed) may suddenly change.
The shell will beep if you type something that causes the search to
fail. This search can be cancelled by hitting Ctrl-G
.
Figure 2.6. Simple history mechanism
-
Hit the up and down arrows a few times.
-
Run some commands from the shell history.
-
Search backwards for a command and issue it again.
The shell preserves your history between sessions, but it can be
confused by multiple sessions running in parallel. At the start of
each session bash reads in its initial history from the file
.bash_history in yolur home directory. As it runs it adds
to its internal version of the file. At logout, it writes back its
internal history to the file.
An older history mechanism
The second mechanism is based around the
“!” key. The command
“!n” will run
command n from the history list. The command
“!-n” will run the
command n lines back in the history list. The
command “!!” is equivalent to
“!-1” and repeats the last command.
A more useful “! command” is
“!string”. This repeats
the last command issued that started with
“string”.
Finally, the expression “!$” is interpreted as the final argument on the previous line. This strange definition turns out to be useful more often than you might expect.
Figure 2.7. Use of the history command
$
history 5 999 ping -c 1 slashdot.org
1000 telnet slashdot.org 80
1001 cd /home/rjd4/CVS_STUFF/courses/linux_sysadmin
1002 imagetool student.ps
1003 history
Figure 2.8. Use of !N
$
!-2imagetool student.ps$
!999ping -c 1 slashdot.org
PING slashdot.org (209.207.224.41): 56 data bytes
64 bytes from 209.207.224.41: icmp_seq=0 ttl=242 time=158.2 ms
--- slashdot.org ping statistics ---
Figure 2.9. Use of !$
$
ls -l abc123$
file !$file abc123
abc123: empty
Command line editing
In addition to the up and down keys accessing the shell's history, there is also a use for the left and right arrows. You can move and edit the current command line.
Figure 2.10. Command line editing
-
Type
“
ls -k x Tab” (no Return)
-
Press left-arrow to move the cursor after the
“
-k”.
-
Delete the “
-k” and type a “-l”.
-
Hit Return.
-
Press the up arrow to get at that command again.
-
Press the left arrow to move the cursor to after the
“
-l”.
-
Delete the “
-l” and hit Return.
Chapter 3. The Filesystem
Table of Contents
This section will describe how the Unix file system works and how you can often manipulate it to attach floppies, CDs and Zip discs to your file system. It will also describe a number of more exotic file types in the Unix file system.
The file system bestiary
This section will discuss just what sorts of entries exist in the Unix file system and exactly how the permissions system works. For simplicity's sake, I shall use the word node to mean any object in the Unix file system and the word file to refer to a node that is a plain file.
Figure 3.1. Types of node in the Unix file system
-
file: a plain file for carrying data
-
directory: a container for other nodes
- symbolic link: a reference to another node
- named pipe: a hook for two programs to communicate
- socket: a pretend network connection
- block device: a hook to talk to hardware a block of data at a time
- character device: a hook to talk to hardware a character at a time
Files. Files are just what you think they are: containers for data. That data might be plain text, a compiled program or an image but that makes no difference to the way the operating system stores them; they are just files.
Directories. Directories are just what you think they are too. These are known as folders in some other operating systems and simply provide a hierarchy for all the nodes.
Given just files and directories we are now in a position to consider just how the Unix file system works under the covers.
Every node in the Unix file system has a number asociated with it called the inode number. The operating system works in terms of these numbers and the number is the real identifier of the file. Directories provide lookups from names to inode numbers. (This is a slight lie, we will tell the whole truth slightly later when we have explained what a physical file system is.)
Figure 3.2. Directories, files and inode numbers
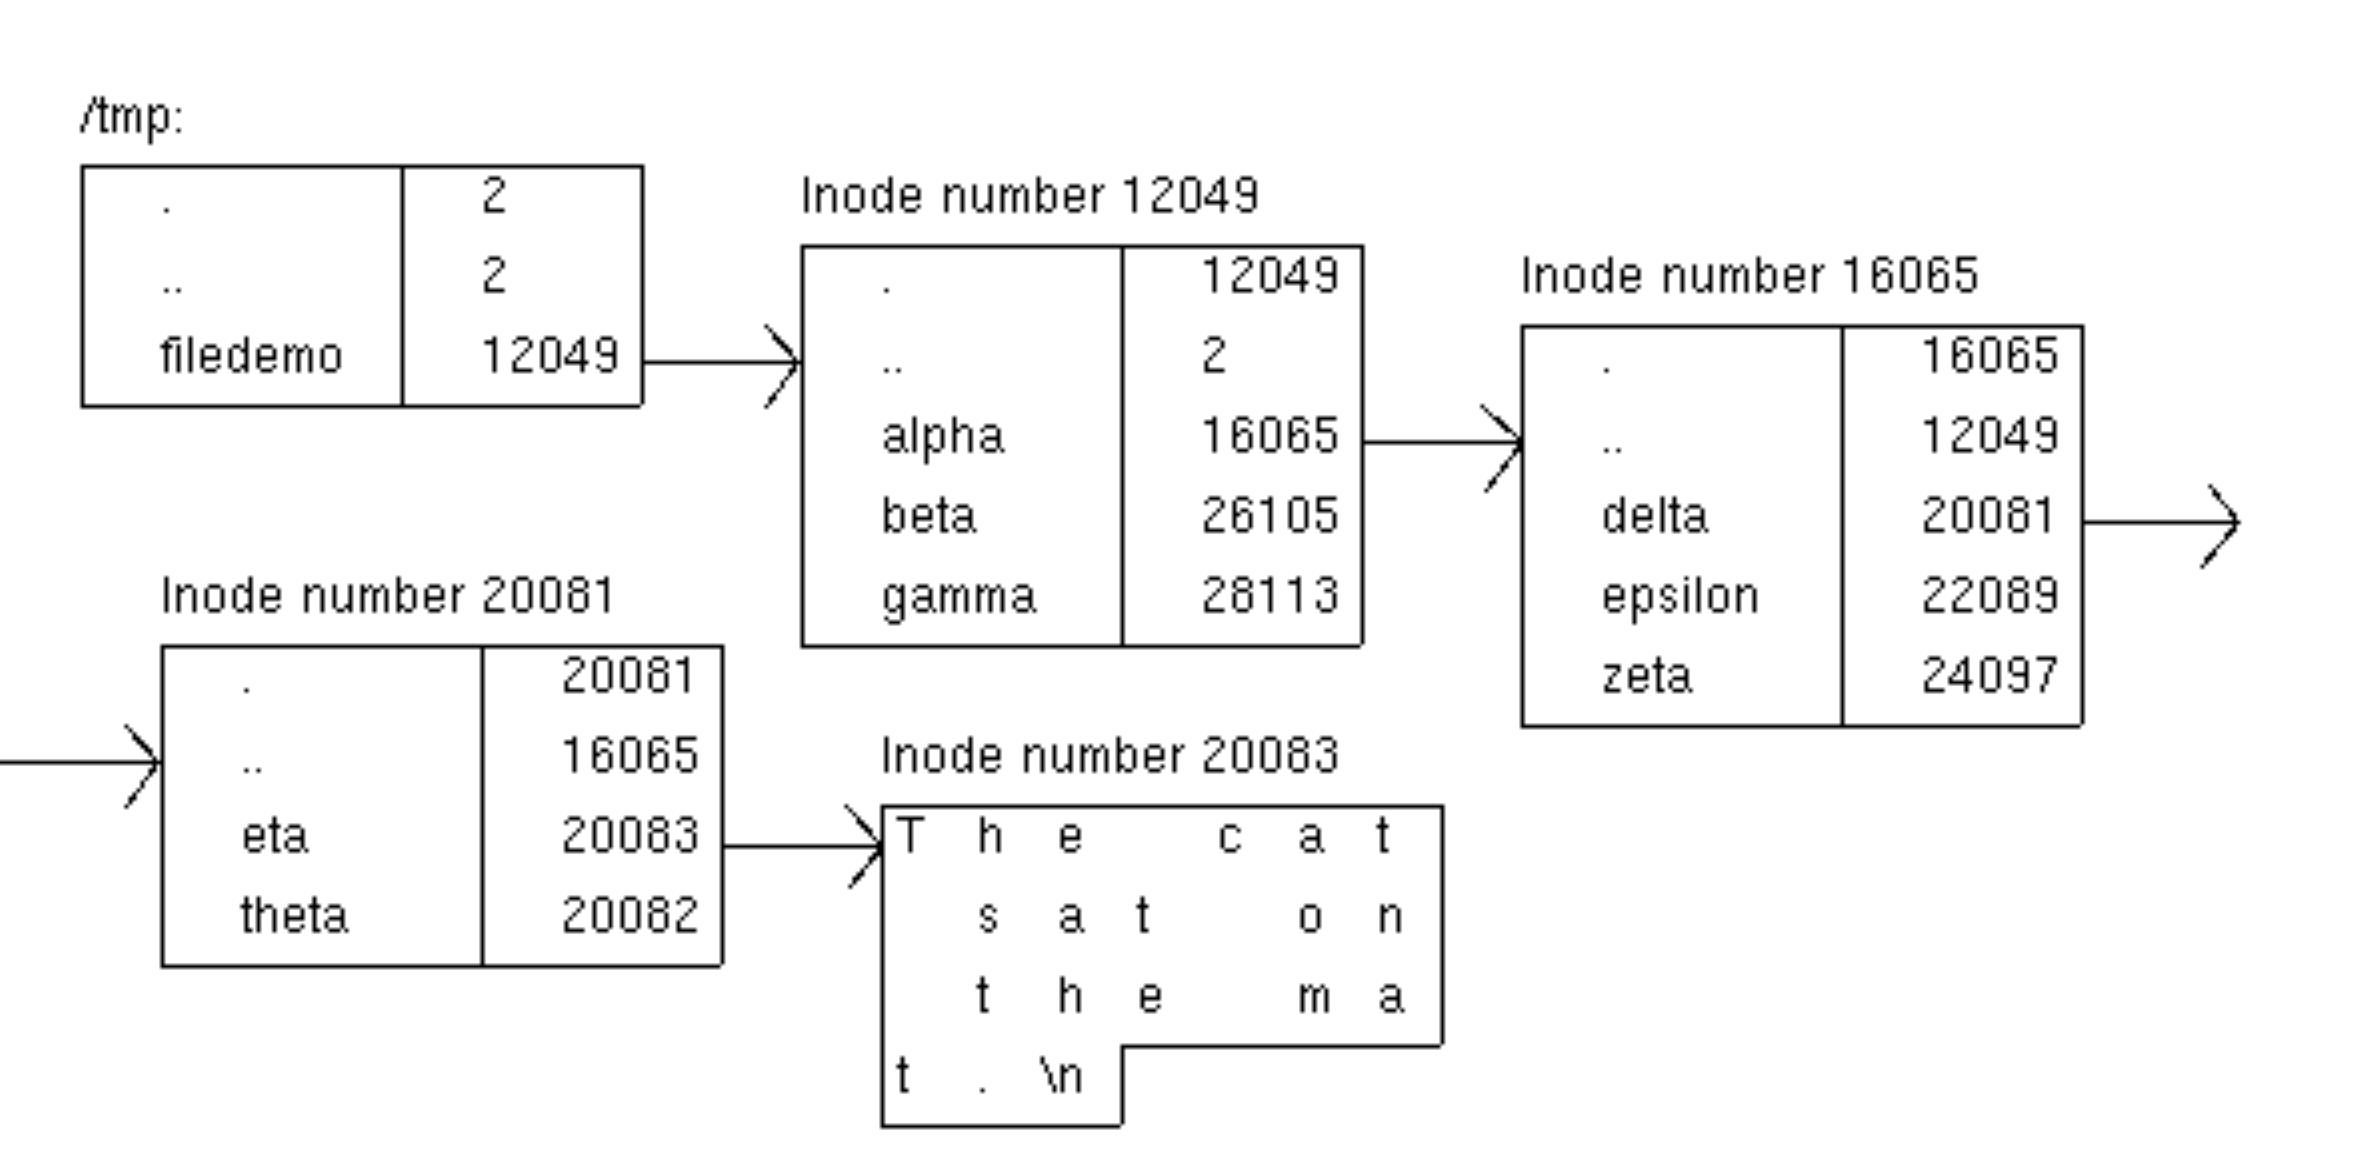
Note that a node does not know what its own name is! That information is stored only by the directory that contains it.
If a process is in the directory /tmp/filedemo and
tries to reference the (relative) filename alpha/delta/eta
then the operating system first looks up alpha in the
current directory (inode number 12049) to get inode number 16065.
It observes that the node with number 16065 is a directory. Then it
looks up delta in that directory to get inode number 20081
which it observes is also a directory. Finally it looks up
eta in that directory to get inode number 20083 which it
observes is a file.
Figure 3.3. Looking at inode numbers
$
cd ${UX}/Lessons/FurtherUnix$
./filedemoFile system demo unpacked in /tmp$
cd /tmp/filedemo$
ls -laitotal 5
12049 drwxrwxr-x 5 rjd4 rjd4 1024 Feb 15 10:35 .
2 drwxrwxrwt 7 root root 1024 Feb 15 11:55 ..
16065 drwxrwxr-x 5 rjd4 rjd4 1024 Feb 15 10:36 alpha
26105 drwxrwxr-x 2 rjd4 rjd4 1024 Feb 15 10:35 beta
28113 drwxrwxr-x 2 rjd4 rjd4 1024 Feb 15 10:35 gamma
- Follow your inode numbers down to
alpha/delta/eta.
To date, all our inode numbers have been different. We will now change that. There is nothing in principle to stop two names referring to the same inode number and therefore to the same node in the filesystem. This is implemented with the ln (“link”) command.
Figure 3.4. Linking to a file
$
cd /tmp/filedemo/alpha/delta$
ls -litotal 1
20083 -rw-rw-r-- 1 rjd4 rjd4 24 Feb 15 10:46 eta
20082 -rw-rw-r-- 1 rjd4 rjd4 0 Feb 15 10:34 theta
$ ln eta iota$
ls -litotal 2
20083 -rw-rw-r-- 2 rjd4 rjd4 24 Feb 15 10:46 eta
20083 -rw-rw-r-- 2 rjd4 rjd4 24 Feb 15 10:46 iota
20082 -rw-rw-r-- 1 rjd4 rjd4 0 Feb 15 10:34 theta
Modify
eta and then look in iota.
Note how the files eta and iota have the same
inode number. Any change you make to eta will be reflected
in iota because at a fundamental level they are the same node.
There is one wrinkle in practice, however. If two directory
entries (one and three) both correspond to the
same inode number which is a directory, which one should be the
parent directory (..) of that child directory?
Figure 3.5. Ambiguous parent directory
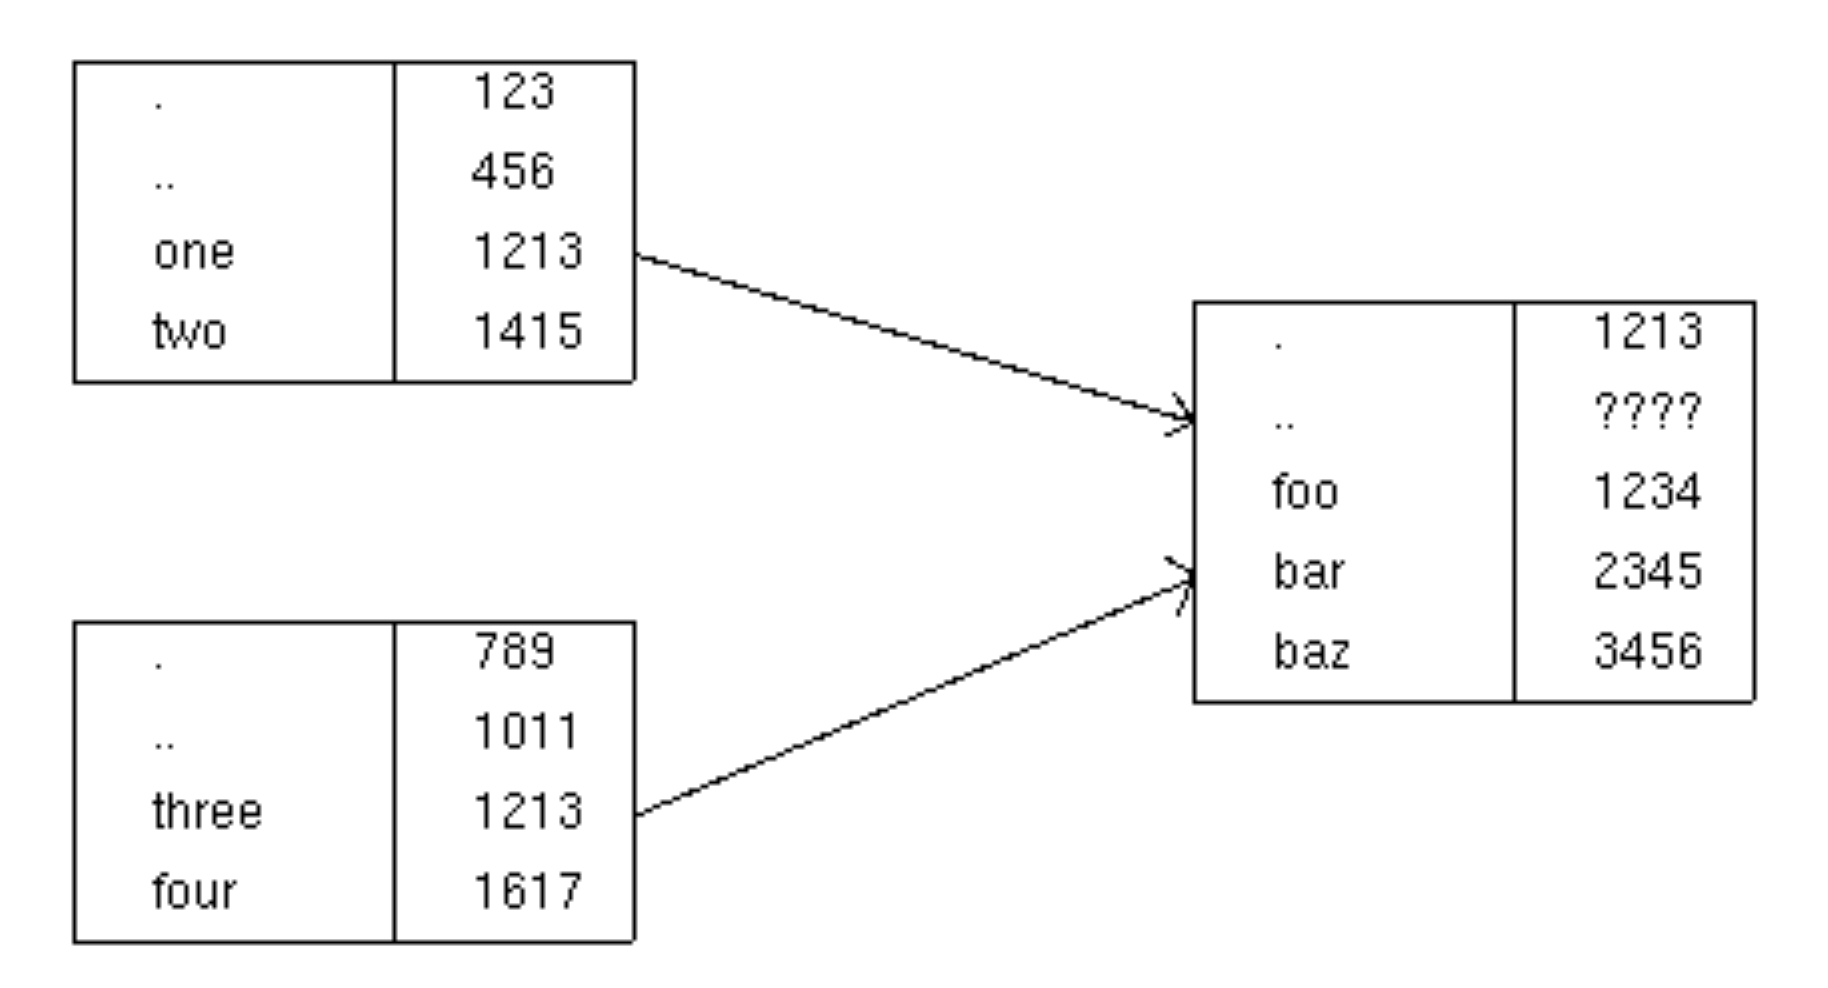
The operating system deals with this possible problem by prohibiting linking to a directory.
If you are familiar with symbolic links please note that these are quite different. The two names referring to the same inode number are exactly equivalent.
Figure 3.6. Two links to the same file
$
pwd/tmp/filedemo/alpha/delta$
ls -litotal 2
20083 -rw-rw-r-- 2 rjd4 rjd4 54 Feb 16 18:15 eta
20083 -rw-rw-r-- 2 rjd4 rjd4 54 Feb 16 18:15 iota
20082 -rw-rw-r-- 1 rjd4 rjd4 0 Feb 15 10:34 theta$
cat etaThe cat sat on the mat.
The cow jumped over the moon.$
cat iotaThe cat sat on the mat.
The cow jumped over the moon.$
rm eta$
cat iotaThe cat sat on the mat.
The cow jumped over the moon.If you make another link to an existing file and then remove the original filename the new name works just as well as the old. This is an important difference to symbolic links.
Symbolic links. Symbolic links are a more straightforward form of alias for another file. The data stored by these nodes is the name of anothe file, given either as an absolute pathname or as a path name relative to the location of the symbolic link. When these nodes are opened instead of using the node's content the operating system looks up the node refered to by the name held in the symbolic link.
Symbolic links are quite different from “real”
links. However they are also created with the ln command but
with the -s option.
Figure 3.7. Creating a symbolic link
$
pwd/tmp/filedemo/alpha/delta$
ln -s iota kappa$
ls -litotal 1
20083 -rw-rw-r-- 1 rjd4 rjd4 54 Feb 16 18:19 iota
20084 lrwxrwxrwx 1 rjd4 rjd4 4 Feb 16 19:59 kappa -> iota
20082 -rw-rw-r-- 1 rjd4 rjd4 0 Feb 15 10:34 theta$
cat kappaThe cat sat on the mat.
The cow jumped over the moon.Unlike real links, if the target of the symbolic link is removed the symbolic links will fail.
Figure 3.8. Symbolic links are not peers with their targets
$
rm iota$
cat kappacat: kappa: No such file or directoryBecause symbolic links are not the equivalents of their targets in the way that real links are we can make a symbolic link to a directory.
When you run the command find . -name | wc -l
you are running two separate processes, find . -name and
wc - at the same time with the output of the first being
“piped” to the input of the second. This is fine if you
are launching both processes at the same time but does not help if
the two processes are being launched at different times or even by
different users.
Named pipes. A named pipe is a node in the
file system that acts in exactly the same way as the pipe
character, ‘|’, in that command. Output can be
sent from one process to that pipe which acts as a buffer. When
that buffer fills up the writing process is paused by the operating
system until something has read some of the buffer. When the
reading process has read some of the buffer the writing process is
reawakened to write some more. Should the reading process ever
empty the buffer it is paused until the writer has written some
more. When the writer closes its output and the reader has emptied
the buffer then the reader is told it has reached the end of
file.
Figure 3.9. Creating a named pipe
$
pwd/tmp/filedemo/alpha/delta$
ls -ltotal 0
lrwxrwxrwx 1 rjd4 rjd4 4 Feb 16 19:59 kappa -> iota
-rw-rw-r-- 1 rjd4 rjd4 0 Feb 15 10:34 theta$
mknod lambda p$
ls -ltotal 0
lrwxrwxrwx 1 rjd4 rjd4 4 Feb 16 19:59 kappa -> iota
prw-rw-r-- 1 rjd4 rjd4 0 Feb 17 11:12 lambda
-rw-rw-r-- 1 rjd4 rjd4 0 Feb 15 10:34 thetaNote how named pipes are identified by a leading
“p” in the output of ls
-l.
Figure 3.10. Using a named pipe
$
ls -lR ~ > lambda &[1] 8517$
jobs[1]+ Running ls -lR ~ >lambda &$
wc -l < lambda 2750
[1]+ Done ls -lR ~ >lambdaA pipe can be reused. The sequence of commands above could be repeated.
So why would we want to use a named pipe? Why can't we just write the output of one program to a file and then have the second file read it in?
One reason is that if one program outputs large amounts of data and the secons program processes it down to a smaller quantity then you might want to avoid having a large data file (quite possibly too large) in between.
Another reason is that you might want the second program to start producing output as soon as possible. It might not be desirable to wait until the first program has finished before starting the second. The second can't just read a partial file because there is no operating system support for distinguishing reaching end of file because the first program has fiished and reachinf end of file because the first program has only written this much so far.
Often the “|” mechanism is sufficient and
you should use this anonymous pipe when you can. But, when
you need them, the file system has named pipes too.
Unix domain sockets. Just as a named pipe is a pipe between two processes implemented in the file system a Unix domain socket is a network connection between two processes implemented in the file system (which, therefore, does not use the filesystem).
There are no convenient shell programs that use Unix domain
sockets (you have to write programs to use them) so we won't cover
them in detail in this course except to note that they exist and
are labelled with an “s” in the output of
ls -l and are created with the mknod command.
Devices. Devices are nodes in the file system that correspond directly to the hardware. Reading and writing to this node reads from and writes to the hardware directly. Devices come in two flavours: block devices and character devices. Block devices are for writing large amounts (‘blocks’) of data (e.g. the disc drives) and character devices are for interactiving with the hardware one character at a time (e.g. for the keyboard).
Typically only root has access to these devices, but
there is often a special case for those devices corresponding to
removable media. For these devices, the operating system switches
the ownership to the user logged in at the console.
Figure 3.11. Ownership of the floppy disc device
$
ls -l /dev/fd0brw-rw---- 1 rjd4 floppy 2, 0 Mar 24 2001 /dev/fd0The leading “b” in the output of ls
-l indicates that this is a block device. If would be a
“c” if it was a character device.
Where the file size would be for a normal file there are two numbers separated by a comma. These are called the major and minor device numbers and are indexes into a table of hardware devices in the kernel.
To illustrate the use of talking directly to the floppy drive, we will demonstrate a simple backup program for making safe copies of files with the tar command. The tar command's name is a contraction of “tape archive” and was originally used to backup to tape devices. We don't have any tape devices in this room so we will talk to the floppy device as if it was a tape. This will destroy any file system that was previously on a floppy; we are going to access the device at the lowest possible level, below the level at which individual files exist. The floppy drive is just a lump of hardware we can write up to 1474560 bytes of data to one after the other with no extra structure.
Figure 3.12. Archiving a set of files
$
cd ${UX}/Lessons/FurtherUnix$
ls data0 1 2 3 4 5 6 7 8 9$
du -sk data3685 data$
tar -cz -f /dev/fd0 data/tar options for making an archive
c: Create an archivez: Use compression when creating itf /dev/fd0: Write the archive to this file or device
Figure 3.13. Unpacking a tar archive
$
cd /tmp$
tar -xzv -f /dev/fd0data/
data/0/
data/0/rfc800.txt
...
data/9/rfc898.txt
data/9/rfc899.txt
gzip: stdin: decompression OK, trailing garbage ignored
tar: Child died with signal 13
tar: Error exit delayed from previous errors$
ls data0 1 2 3 4 5 6 7 8 9tar options for unpacking an archive
x: Extract from an archivez: The archive is compressedv: Be verbose.f /dev/fd0: Read the archive from this file or device
The warning messages at the end simply mean that the archive didn't fill the entire disc. The “trailing garbage” is the remainder of the disc beyond the end of the archive.
As well as unpacking (“extracting”) the archive it
is possible to lists its contents by replacing the x
option with t.
It is also possible to unpack or list just parts of an archive by quoting just the parts you want after the unpacking command. For example, the command
$tar -xz -f /dev/fd0 data/0 data/1
would unpack just the
0 and 1 subdirectories of
data.There is one last common use of writing directly to a floppy.
That is for the purpose of writing a file system to the disc.
Rather than create a DOS file stystem and then unpack an archive on
to it, it is sometimes useful to record the entire disc as raw data
and then write it back. This will duplicate volume labels, file
update times etc. There is the image of a file system in
${UX}/Lessons/FurtherUnix/floppy.img which we will use
later in this class. (Don't worry about the mdir command.
That command will be explained a bit later.
Figure 3.14. Writing a disc image onto a floppy
$
mdir a:init A: non DOS media
Cannot initiailize 'A:'$
cd ${UX}/Lessons/FurtherUnix$
cat < floppy.img > /dev/fd0$
mdir a:Volume in drive A is Further Use of Unix (abbr=FURTHER USE)
Volume Serial Number is 0E0C-8E4E
Directory for A:/
Y1998P~1 PDF 25973 02-17-2002 13:53 y1998p1q2.pdf
...
Y2000P~3 PDF 31452 02-17-2002 13:53 y2000p1q8.pdf
9 files 307 579 bytes
1 148 416 bytes free
mdir is one of the M-tools, a series of commands
that duplicate their DOS equivalent commands on Unix. The
pseudofilename a: is understood by the M-tools (and not by
other utilities) to maean the floppy drive.
Figure 3.15. Some M-tools
- mcd: change MSDOS directory
- mcopy: copy MSDOS files to/from Unix
- mdel: delete an MSDOS file
- mdir: display an MSDOS directory
- mformat: add an MSDOS filesystem to a low-level formatted floppy disk
- mlabel: make an MSDOS volume label
- mtype: display contents of an MSDOS file
Permissions
We will consider file permissions next. Many of you will already understand the details of file and directory permissions but we want to describe them because we will be using certain facilities which you may not have seen before.
We'll start with the easy case: the permissions on a plain file. Every file has a user and a group. It also has read, write and execute permissions for “user”, “group” and “other”. The rules that ar eapplied to determine whether a user can do something are very simple, but are applied absolutely and can have counter-intuitive consequences. Part of the purpose of this course is to upgrade your intuition.
Rules for plain files
- Are you the same user as the file's?
If you are, apply the “user” permissions and do not look at the ‘group’ or ‘other’ permissions. - Are you in the file's group?
If you are, apply the “group” permissions and do not look at the ‘other’ permissions. - Apply the “other” permissions.
Note that this means that even if a file is other-readable but not user-readable, then the relevant user will not be able to read it.
What the permissions mean on a file is pretty clear: can I read it, can I write to it and can I run it as a program? Note that a shell script needs to be both executable and readable by the user running it but a binary executable (e.g. a compiled program) need only be executable.
Figure 3.16. Looking at file permissions
$
cd ${UX}/Lessons/FurtherUnix$
./permdemoPermissions demo unpacked in /tmp/permdemo- Which files can you read from?
- Which files can you write to?
What the permissions mean for a directory is slightly different. To understand read and write permissions, recall that the names of nodes are stored in parent directories and not with nodes themselves. Also recall that deleting a node involves removing its name from the parent directory.
Rules for directories
- Read permission means you can read a directoriy, i.e. get the list of names of the directory's content.
- Write permission means you can alter the content of the directory (e.g. create, delete or rename entries).
- Execute permission means something completely different, because it's meaningless to talk about executing a directory. This controls whether or not you can make this directory your current directory (i.e. cd into it).
For directories the read and execute permissions typically go hand-in-hand.
Figure 3.17. Looking at directory permissions
$
ls Lls: L: Permission denied$
cat L/READMEThis is a README file in directory L. The file is world readable.- Which directories can you ls?
- Which directories can you read
READMEfrom?
Internally, the permissions are stored as part of a number whose binary representation has the bits in it to control whether user's, group's or other's read, write and execute permissions are set. This number is called the file's mode. If the mode is written in octal (base 8) then the three sets of permissions (user's, group's and user's) appear as three numbers between 0 and 7. For this reason it is conventional to express the mode in octal and when the chmod program is used with a numeric argument to set a file's permissions the number should be expressed in octal.
The numbers are calculated using the formula read=4, write=2,
execute=1. So, for example,
rw-rw-r--=(4+2)(4+2)(4)=664.
When a file is first created its initial permissions are controlled by a value known as the umask. This governs which permissions bits in the file being created are not set; i.e. it masks out the bits in the final mode of the file.
Figure 3.18. Demonstrating umask
$pwd/tmp$
umask002$
touch fubar$
mkdir snafu$
ls -ld fubar snafu/-rw-rw-r-- 1 rjd4 rjd4 0 Feb 17 16:12 fubar
drwxrwxr-x 2 rjd4 rjd4 1024 Feb 17 16:13 snafu/$
umask 022$
touch laurel$
mkdir hardy$
ls -ld laurel hardydrwxr-xr-x 2 rjd4 rjd4 1024 Feb 17 16:14 hardy
-rw-r--r-- 1 rjd4 rjd4 0 Feb 17 16:14 laurelBuilding and adding to the file system
We will start by considering how the Unix file system is made
up. When the system first boots its only file system is an empty
directory called /. The operating system's idea of its
file system is called the virtual file system. A very early
job in the boot sequence is to add more to the virtual
filesystem.
Figure 3.19. Virtual file system before anything is added

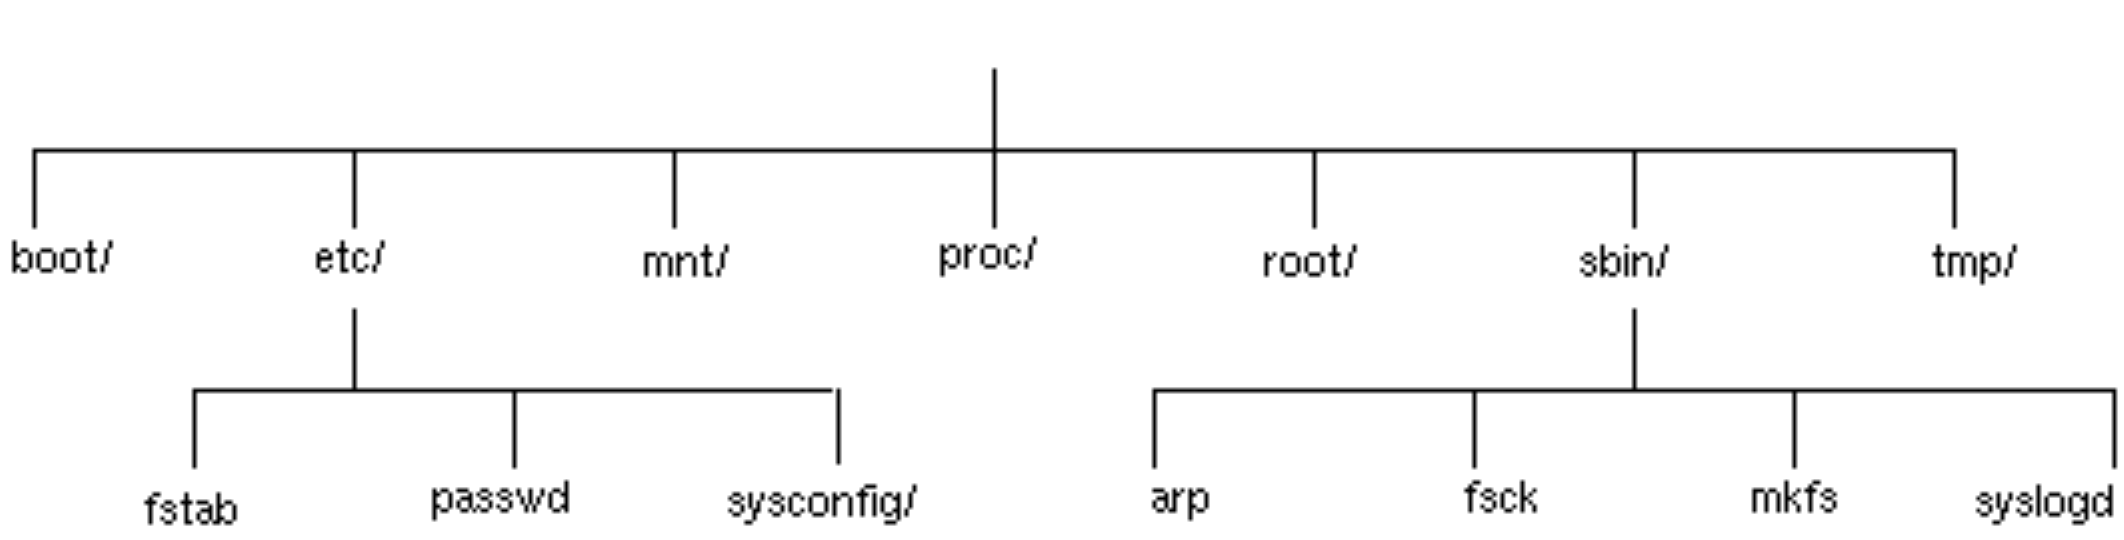
Part of the information passed to the operating system is the
location on disc of its top-level file system (the
“root” file system). This is a so-called physical file
system (because it's real) and simply lacks an entry at the top. In
this example, we will suppose that the root file system is on the
fifth partition of the first hard drive. This partition is called
hda7. (hd for hard drive, a for the
first of these and 7 for the seventh partition.) Note that
many of the directories in this physical file system that you might
expect to have contents are in fact empty at the moment. They will
have content added later.
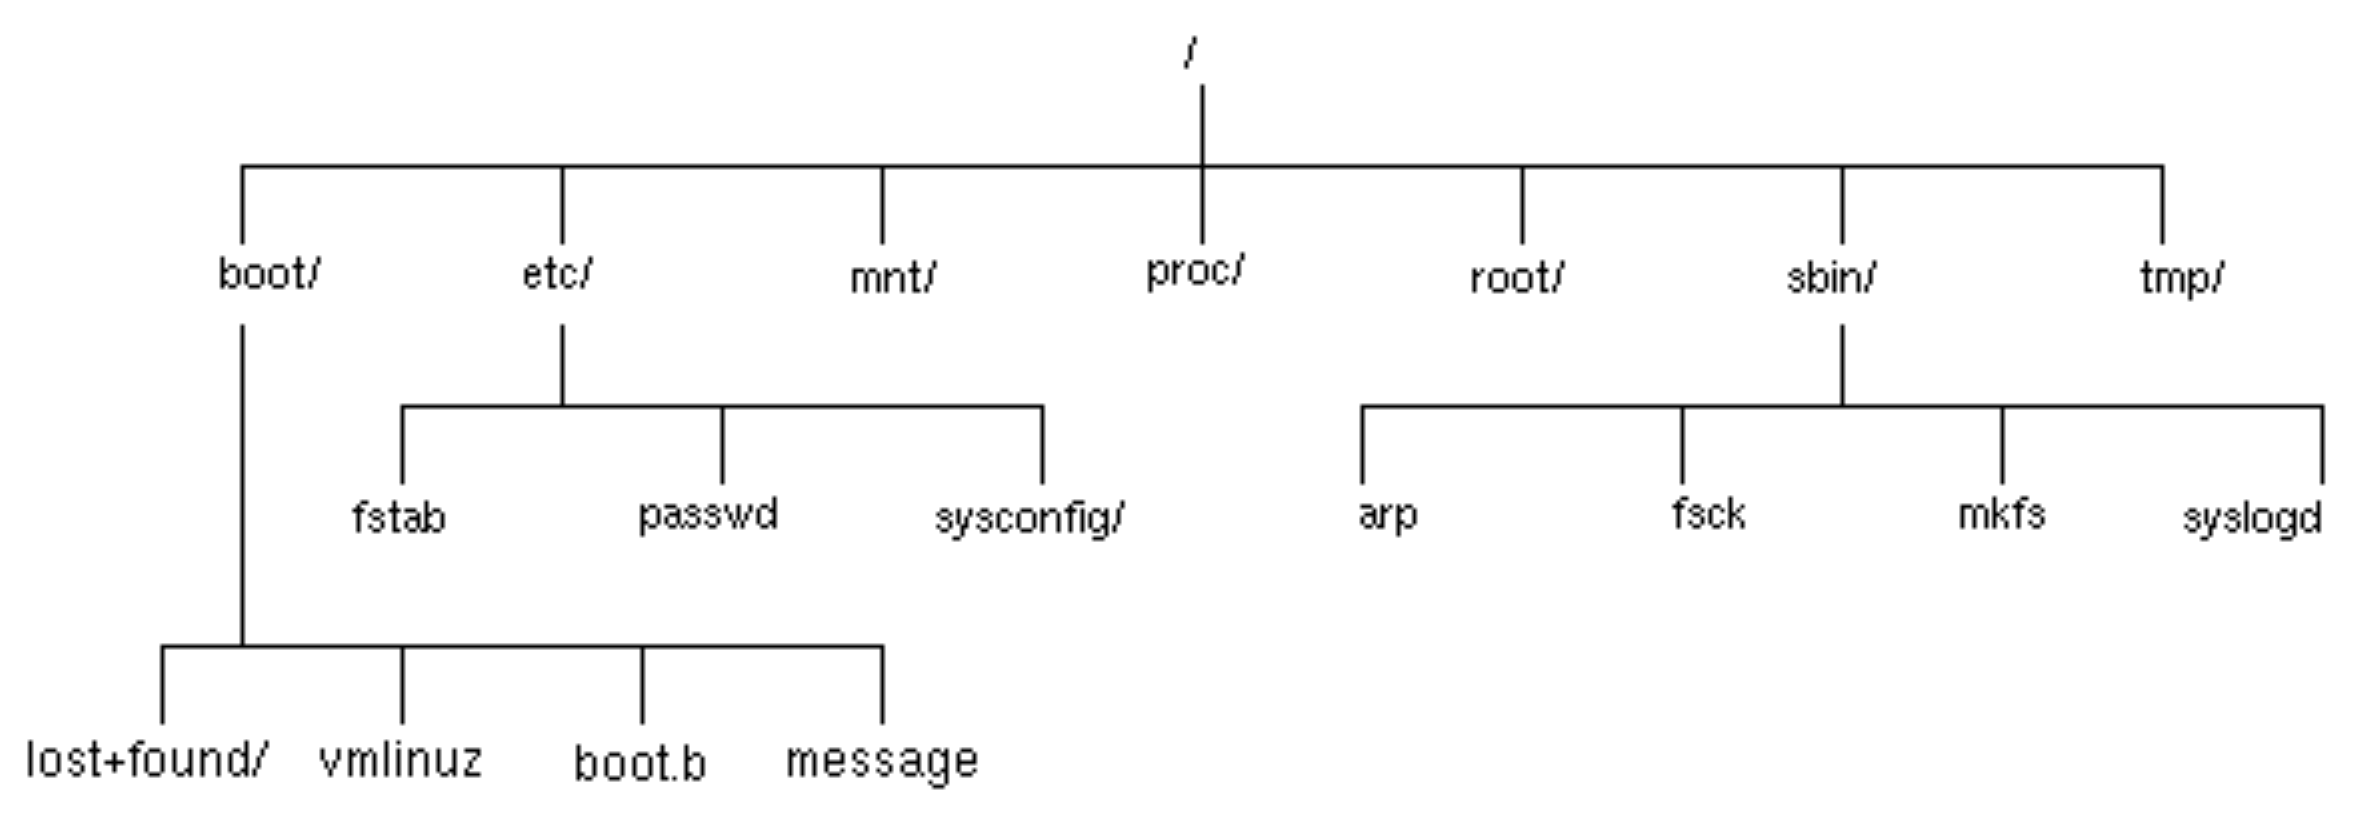
Figure 3.20. Part of the root physical file system
The operating system then attaches this physical file system to
its virtual file system. This operation is called mounting
and the operating system is said to mount hda7 on
/.
Figure 3.21. Virtual file system with the root file system mounted
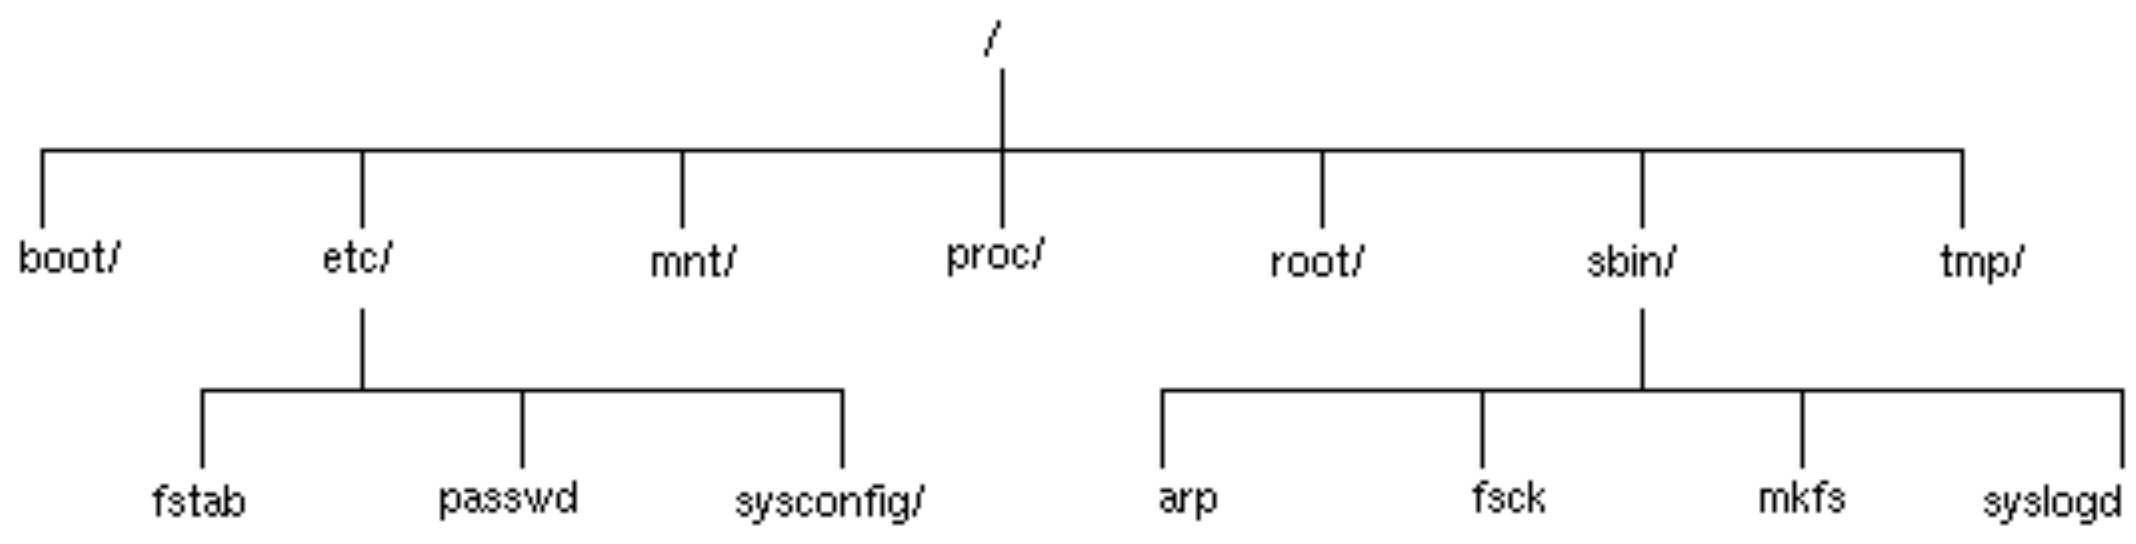
At this stage the /boot, /tmp and
/proc directories are empty. These will be given content
by further mounting. To learn what further mounting is required the
operating system reads the file /etc/fstab. We don't need
to understand the whole of this file but a few salient details will
make life easier for us.
Figure 3.22. /etc/fstab
/dev/hda7   /           ext2    defaults          1 1

/dev/hda2   /boot       ext2    defaults          1 2

/dev/hda6   /tmp        ext2    noauto,defaults   0 0

/dev/hda5   swap        swap    defaults          0 0

none        /proc       proc    defaults          0 0

/dev/fd0   /mnt/floppy auto      noauto,owner    0 0

/dev/cdrom  /mnt/cdrom   iso9660 noauto,owner,ro   0 0
The first, hda7 line is for consistency. The operating
system already knows where to get its top-level file system from to
mount on /. The next two lines, hda2 and
hda6 tell it to mount two more physical file systems into
the virtual file system.
Figure 3.23. Part of the /boot physical file
system

The operating system mounts this file system on the (empty)
/boot directory contained in the root file system.
Figure 3.24. Virtual file system with the /boot file
system mounted
/tmp is mounted from hda6 in a similar way but
is typically empty.
Now we have to admit to an untruth earlier in the course. Earlier we said that a node in the file system was uniquely identified by its inode number. Well, that's true within a physical file system but not over the whole virtual file system. Over the virtual file system any node is uniquely identified by the pair of the physical file system and the inode number on that file system. And that's the truth. Honest.
Because the ln command simply sets entries in directories, it is impossible to set hard links across different physical file systems. This is another plus for symbolic links which can span physical file systems.
hda5 is used for system virtual memory and has no
physical file system so is not mounted into the virtual file
system. It's place in the /etc/fstab file is just a
convenient place to stash the information.
The /proc node in the virtual filesystem, on the other
hand is mounted into the virtual file system but has no
corresponding physical file system. There's no corresponding bit of
disc. Instead it is used as a window into the kernel's state at any
time as a way to look at processes. We shall look at this briefly
later.
Finally, the last two lines refer to devices.
/dev/cdrom and /dev/fd0 correspond to the CD-ROM
and floppy drives respectively. The owner option along the
line means that the person logged in at the system can mount (and
unmount) these devices on /mnt/cdrom and /mnt/fd0
respectively. Those systems with Zip discs should have a line for
them too.
There are a number of ways of accessing the floppy drive; mounting is just one of them.
Figure 3.25. Before mounting a DOS floppy
-
Check ownership of
/dev/floppy.
-
Check
/mnt/floppyis empty.
Figure 3.26. Mounting a DOS floppy
-
Insert and mount the floppy.
-
Look in
/mnt/floppyagain.
-
Can you unmount
/mnt/floppywhen it is your current directory?
-
Unmount and eject the floppy.
Mounting a DOS floppy: details
-
Check ownership of
/dev/floppy.
$ls -l /dev/floppy
-
Check
/mnt/floppyis empty.
$ls -l /mnt/floppy
-
Insert floppy.
-
Mount floppy.
$mount /mnt/floppy
-
Look in
/mnt/floppyagain.
$ls -l /mnt/floppy
-
Can you unmount
/mnt/floppywhen it is your current directory?
$cd /mnt/floppy
$umount /mnt/floppy
umount: /mnt/floppy: device is busy
-
$
cd
$umount /mnt/floppy
$
-
Note that the directory is empty again.
$ls -l /mnt/floppy
-
Eject floppy.
What a rigmarole! While this is typically useful for large removable media like CD-ROMS and, perhaps, Zip discs it isn't particularly sensible for floppy discs. This is why the M-tools exist.
We still have not properly addressed the /proc line in
/etc/fstab file. If you ls /proc you will
see a number of directories, some with purely numerical names and
others with words for names.
Each of the named directories carries information about the
operating system. For example /proc/cpuinfo will tell you
details of the processor running the operating system.
More interestingly for us, the numbered directories give information about the process with that number.
Figure 3.27. Investigating /proc
$
echo $$1055$
ls -l /proc/1055total 0
...... $
cd$
ls -l /proc/1055total 0...
...
There's one last sort of file system we should look at: the network file system. A network file system is a means to access remote files as apparently local. Instead of the kernel converting operations on the virtual filesystem into operations on the appropriate physical file system it converts them into network instructions. These are converted by a server at the remote end that then converts them into operations on a physical file system. Linux supports a variety of different network file systems including NFS (Network File System—the original), NCPFS (Novell file systems as used on PWF Linux) and SMB (as used with Windows).
Chapter 4. The Secure Shell program
Table of Contents
If you pass your userid and password over the network they will get snooped eventually. That is a sad, but accuate, reflection of the current computing world.
To remove this problem, and a few others too, we provide the ssh program. This chapter will discuss ssh and its associated commands. To really enjoy this section you need to have an account on another box running a reasonably recent SSH service. (It needs to support version 2 of the protocol.)
-
slogin: ‘Secure Login’
This program is used to log in to remote systems.
-
ssh: ‘Secure Shell’
This program is used to run a (typically single) command on a remote system. It also gives its name to the suite of programs: "the ssh programs".
-
scp: ‘Secure Copy’
This program is used to transfer files to and from remote systems.
-
sftp: ‘Secure File Transfer’
This program is used to transfer files to and from remote systems and is more similar to the FTP program. It is not always possible to use sftp depending on the facilities provided by the remote system.
Basic use
The examples shown here are all run the from the command line. We will now show some examples of slogin's use. Note that the first time you ever log in to a system you may be asked one extra question by slogin.
-
We start by launching slogin followed by the name of the
remote system we want to connect to.
$slogin hydra.csi.cam.ac.uk
The authenticity of host 'hydra.csi.cam.ac.uk (131.111.8.86)' can't be established.

RSA1 key fingerprint is d8:7e:70:68:4c:b2:6e:92:ed:50:16:1c:2d:1c:19:3b.

Are you sure you want to continue connecting (yes/no)?
This is the stage you will only see once for each remote system (hydra.csi.cam.ac.ukin this example). Part of the security of the connection is provided by the workstation being sure it is talking to the right system at the far end and not some other system pretending to be it. This is done by a piece of cryptography beyond the scope of this documentation. The upshot of it is that there must be a record of the remote system at this end for checking against. If you have never connected tohydra.csi.cam.ac.ukbefore you won't have this record. So the first time you connect you must take it on trust. You are given some “fingerprint” information to help you ensure it is thwe right system, but there are no central records of these fingerprints to check against so they are of limited use.
For some major servers in the University the records have already been collated and put in a central file on the workstation so for important systems like Hermes you won't be asked for this leap of faith. -
In this example we will accept the validity of the connection.
If we had declined then the connection would have been broken.
The authenticity of host 'hydra.csi.cam.ac.uk (131.111.8.86)' can't be established.

RSA1 key fingerprint is d8:7e:70:68:4c:b2:6e:92:ed:50:16:1c:2d:1c:19:3b.

Are you sure you want to continue connecting (yes/no)?
yes
-
Next, having accepted a connection to the remote system, you
must identify yourself to the remote system for it to accept you.
While the password is shown in the example note that your password is not echoed to the screen in
practice.
rjd4@hydra.csi.cam.ac.uk's password:pi314e27
All data being passed overthe network by slogin is encrypted. Your userid and password cannot be recorded by a malicious third party listening in on network traffic.
-
You are now logged in to the remote system.
Last login: Wed Oct  3 12:10:57 2001 from gelatinous-cube.

Sun Microsystems Inc.   SunOS 5.8       Generic February 2000

No mail.

bash-2.03$
Any subsequent logins to the same remote host should not trigger the same host authenticity warning.
$
slogin hydra.csi.cam.ac.ukrjd4@hydra.csi.cam.ac.uk's password: pi314e27Last login: Wed Oct 3 15:56:07 2001 from gelatinous-cube.
Sun Microsystems Inc. SunOS 5.8 Generic February 2000
No mail.
bash-2.03$
If you have a different userid on the remote system than it can be quoted on the command line by preceding the hostname with the userid and an at-sign, @.
$
slogin bob@balrog.csi.cam.ac.ukbob@balrog.csi.cam.ac.uk's password:
Under certain unusual circumstances you will be presented with a warning connecting to a system that either you have visited before or which we have stored the record for ourselves.
$
slogin hydra.csi.cam.ac.uk@@@@@@@@@@@@@@@@@@@@@@@@@@@@@@@@@@@@@@@@@@@@@@@@@@@@@@@@@@@
@ WARNING: REMOTE HOST IDENTIFICATION HAS CHANGED! @
@@@@@@@@@@@@@@@@@@@@@@@@@@@@@@@@@@@@@@@@@@@@@@@@@@@@@@@@@@@
IT IS POSSIBLE THAT SOMEONE IS DOING SOMETHING NASTY!
Someone could be eavesdropping on you right now (man-in-the-middle attack)!
It is also possible that the RSA1 host key has just been changed.
The fingerprint for the RSA1 key sent by the remote host is
d8:7e:70:68:4c:b2:6e:92:ed:50:16:1c:2d:1c:19:3b.
Please contact your system administrator.
Add correct host key in /servers/rjd4/PWF-HOME-KZ/OR/RE-RJ/RJD4/.ssh/known_hosts to get rid of this message.
Offending key in /servers/rjd4/PWF-HOME-KZ/OR/RE-RJ/RJD4/.ssh/known_hosts:18
RSA1 host key for hydra.csi.cam.ac.uk has changed and you have requested strict checking.
This means that the record at the workstation end does not tie up with the data presented by the far end. What this really means in practice is one of three things.
By far the most common cause of this is that the remote system has been reinstalled and the records at its end were not preserved over the reinstallation. You now have an out of date record in your PWF account that you need to remove.
The other two cases involve security attacks where the remote system either is being imitated by an imposter this time or was being imitated by an imposter the first time you connected to it. This is much rarer but if the connection is being made to a UCS system then this really shouldn't happen and if you see this message please contact the Help Desk as it is likely to be a security incident.
If you need to remove an out of date record from your PWF
account because the remote system has changed its end then follow
this procedure for the two files ~/.ssh/known_hosts and
~/.ssh/known_hosts2. It is quite possible that the machine
you need to remove only appears in one of these files or even that
only one of these files will exist.
-
Open the file with a plain text editor (vi, emacs,
pico -w, not a
word processor).
-
Search for the line starting with the machine's name.
Inknown_hosts:
hydra.csi.cam.ac.uk,131.111.8.86 1024 33 135453528244700266384215638898398664

07351082137527268751581558499173381992831037340538811476607388550804323131890

66281594113915293223890056816366822043415686100278795830858815566008436330196

38824406039606812629274024425338726739371608288960553566748266694381643201634

688777631521927935330842276417
Inknown_hosts2:
hydra.csi.cam.ac.uk,131.111.8.86 ssh-rsa AAAAB3NzaC1yc2EAAAABIwAAAIEAueQKe9yq

gnS+27Vmlpba5l7pwCTkehO1tgDl1K6F4Ix/GLD8L4BBT10eJJkE4p7EhmoUnuskDYmh0C1P+i6sv

hQzbnlB2WbHCGU4eR/uWiDAyhrV+0HMEWr3ozV4vjUGZprZTVV52G4aP5mnx71zGJ/qrwdpZmUqSH

DM=
-
Delete the line.
-
Repeat the last two steps until there are no matching lines. (It
is possible for a machine to appear more than once under certain
circumstances.)
-
Save the file back and quit the editor.
Transferring files with scp
There are two tools for transferring files to or from a remote system. One, scp is simple and best used for just a few files if you know in advance where they are going to and coming from. The other, sftp, is only useful if the far end runs version 2 of the protocol and has support for the service enabled. We will consider scp first.
We will demonstrate it by transferring all the files in
/tmp/data to another machine. In this case I will use my
office workstation, hydra.csi.cam.ac.uk, to transfer the
files too.
$
scp -r data hydra.csi.cam.ac.uk:/tmprjd4@hydra.csi.cam.ac.uk's password: pi314e27Using sftp
The sftp command acts like a primitive ftp program. The differences are that sftp lacks some of ftp's more sophisitcated (and less often used) options and posesses a secure communication link that ftp lacks.
To connect to a remote system issue the command followed by the remote system's name.
$
sftp hydra.csi.cam.ac.ukConnecting to hydra.csi.cam.ac.uk...
rjd4@hydra.csi.cam.ac.uk's password: pi314e27sftp>
All the options available from within sftp are listed in response to the help or ? command.
sftp> helpAvailable commands:As can be seen, a small set of the usual commands are available, but which operate on the remote system rather than the local one: cd, chgrp, chmod, chown, ls, mkdir, pwd, exit, rm and rmdir.
Some commands are subtly different. The ln command always creates a symbolic link rather than optionally a hard link. To avoid confusion it is probably better to stick to using the symlink synonym.
Some of these have local equivalents named by preceding the remote version with an l: lcd, lls, lmkdir and lpwd. However, with the exception of lcd, these are purely convenience function names. An arbitrary local commnad can be run by preceding it with a !. This starts a subshell which runs the command and then exits, returning control to the sftp program. So the command
sftp> lls
is exactly equivalent to
sftp> !ls
and it is possible to issue the command
sftp> !dateMon Oct 8 18:50:48 BST 2001
where there is no ldate command within sftp.
Furthermore it is possible to build up complex command lines after
the ! just as one can at the usual shell prompt:
sftp> !ls | sort
The one command that you must use with the l version is
lcd. The command !cd fubar would create a subshell
and that subshell would change directory to fubar and then
exit. The parent process, sftp would not have moved.
Therefore special measures are required and these are provided by
lcd.
However, the most commonly used sftp commands are ls to inspect the remote end, get to fetch files from it and put to send files to it. This is best demonstrated by example.
sftp> pwdRemote working directory: /home/rjd4
sftp> cd Javasftp> get *.javaFetching /home/rjd4/Java/Hello.java to Hello.javaDoing without the password
So far we have had to quote our password every time we have made a connection. It is possible to set up SSH so that your account on one system will trust another.
In the examples given below we will assume that the remote system is using a modern (by which I mean version 2) SSH implementation. Hassle your system administrator if you ar estill running with version 1 only. SSHv2 supports two different cryptographic protocols, RSA and DSA. We will set up our end to use either.
The following procedure needs to be done only once per remote system.
Procedure 4.1.
-
We start by creating the RSA keys. If you have files
~/.ssh/id_rsaand~/.ssh/id_rsa.pubthen you can skip this stage. (You should have neither or both. Having one or the other is a sign that something has gone wrong.)
We will accept the default location for the keys and not request a passphrase (another level of encryption) as this will get in the way of passwordless access).
$ssh-keygen -t rsaGenerating public/private rsa key pair.
Enter file in which to save the key (/servers/rjd4/PWF-HOME-KZ/OR/RE-RJ/RJD4/.ssh/id_rsa):
Enter passphrase (empty for no passphrase):
Enter same passphrase again:
Your identification has been saved in /servers/rjd4/PWF-HOME-KZ/OR/RE-RJ/RJD4/.ssh/id_rsa.
Your public key has been saved in /servers/rjd4/PWF-HOME-KZ/OR/RE-RJ/RJD4/.ssh/id_rsa.pub.
The key fingerprint is:
41:9c:51:f9:2a:ec:af:3b:e4:f8:8f:a9:dc:cb:a4:87 rjd4@basilisk.csi.cam.ac.uk
-
We repeat the process to create the files for the DSA mechanism.
This time, ssh-keygen takes the -t dsa
option.
$ssh-keygen -t dsaGenerating public/private dsa key pair.
Enter file in which to save the key (/servers/rjd4/PWF-HOME-KZ/OR/RE-RJ/RJD4/.ssh/id_dsa):
Enter passphrase (empty for no passphrase):
Enter same passphrase again:
Your identification has been saved in /servers/rjd4/PWF-HOME-KZ/OR/RE-RJ/RJD4/.ssh/id_dsa.
Your public key has been saved in /servers/rjd4/PWF-HOME-KZ/OR/RE-RJ/RJD4/.ssh/id_dsa.pub.
The key fingerprint is:
2a:9f:34:59:3a:ce:e2:7a:10:c3:5a:05:7b:73:36:75 rjd4@basilisk.csi.cam.ac.uk
-
Next we will transfer the two public parts of the keys to the
remote host,
hydra.csi.cam.ac.ukin this case. We must be careful not to overwrite any equivalent files on the remote host.
$scp ~/.ssh/id_rsa.pub hydra.csi.cam.ac.uk:pwfkey_rsa.pub
rjd4@hydra.csi.cam.ac.uk's password:pi314e27
id_rsa.pub 100% ************** 244 00:00
$scp ~/.ssh/id_dsa.pub hydra.csi.cam.ac.uk:pwfkey_dsa.pub
rjd4@hydra.csi.cam.ac.uk's password:pi314e27
id_dsa.pub 100% ************** 624 00:00
-
Now we log in to the remote system. This should be the last time
you ever have to quote your remote password from this system.
$slogin hydra.csi.cam.ac.uk
rjd4@hydra.csi.cam.ac.uk's password:pi314e27
Last login: Tue Sep 11 11:29:32 2001 from basilisk.csi.cam.ac.uk

hydra:rjd4$
-
On the remote box we must append the two files we transferred to
~/.ssh/authorized_keys2. If the.sshdirectory does not exist you must create it first and make it accessible only by you. You also need to make sure that only you can update the~/.ssh/authorized_keys2file.
hydra:rjd4$mkdir ~/.ssh
hydra:rjd4$chmod og-rwx ~/.ssh
hydra:rjd4$cat pwfkey_rsa.pub pwfkey_dsa.pub >> ~/.ssh/authorized_keys2
hydra:rjd4$chmod go-w ~/.ssh/authorized_keys2
You can now delete the files you copied over. They are no longer needed now that they have been appended to the important file. -
Logout of the remote system.
-
Now login to it again. You should not be prompted for a
password.
$slogin hydra.csi.cam.ac.ukLast login: Tue Sep 11 12:13:40 2001 from basilisk.csi.cam.ac.uk
hydra:rjd4$
The title of this document is:
Further Use of Unix
URL:
http://www-uxsup.csx.cam.ac.uk/courses/moved.FurtherUse/index.html