| SUSE LINUX – Administration Guide Chapter 6. Additional Information on Printing / 6.8. Reformatting PostScript with psutils | ||||
|---|---|---|---|---|
 | 6.7. Working with a2ps | 6.9. ASCII Text Encoding |  | |
| SUSE LINUX – Administration Guide Chapter 6. Additional Information on Printing / 6.8. Reformatting PostScript with psutils | ||||
|---|---|---|---|---|
| 6.7. Working with a2ps | 6.9. ASCII Text Encoding | | |
To use one of the reformatting programs described below, generate a PostScript input file by printing to a file, such as /tmp/in.ps, from within an application. Check with file /tmp/in.ps to see whether the generated file is really in PostScript format.
The package psutils includes a number of programs to reformat PostScript documents. The program pstops, in particular, allows you to perform extensive transformations. Details can be obtained in the manual page of pstops. The package psutils is not included in the standard setup of SUSE LINUX, so you may need to install it.
The following commands only work if the application program has created a PostScript file appropriate for such reformatting operations. This should mostly be the case, but there are some applications that cannot generate PostScript files in the required way.
The command psnup -2 /tmp/in.ps /tmp/out.ps takes /tmp/in.ps as its input and transforms it into the output file /tmp/out.ps in such a way that two pages are printed side by side on one sheet. However, with the contents of two pages being included on one, the complexity of the resulting document is much higher and some PostScript printers may fail to print it, especially if they are equipped with only a small amount of standard memory.
The program pstops allows you to change the size and positioning of PostScript documents:
pstops '1:0@0.8(2cm,3cm)' /tmp/in.ps /tmp/out.ps
This command scales the document by a factor of 0.8, which effectively scales down an A4 page from about 21x30 cm to about 17x24 cm. This, in turn, leaves an additional margin of about 4 cm on the right and 6 cm on the top. Therefore, the document is also shifted by 2 cm towards the right and 3 cm towards the top to get roughly the same margins everywhere.
This pstops command shrinks the page by quite an amount and also provides for relatively wide margins, so it should generate a page that is almost always printable — even with those applications that are far too optimistic about the limits set by your printer. You can use a command like the above for those cases where the application's printer output in /etc/in.ps is too large for the printable area.
As another example:
pstops '1:0@0.8(2cm,3cm)' /tmp/in.ps /tmp/out1.ps
psnup -2  /tmp/out1.ps /tmp/out.ps
These commands place two heavily scaled-down pages on one sheet, leaving quite a lot of space between them. To improve this, include instructions to position each of the pages individually:
pstops '2:0L@0.6(20cm,2cm)+1L@0.6(20cm,15cm)' \
  /tmp/in.ps /tmp/out.ps
The above command must be entered as a single line without the \.
The following is a step-by-step explanation of the page specifications as expressed by pstops '2:0L@0.6(20cm,2cm)+1L@0.6(20cm,15cm)':
Two pages are merged into one and pages are counted modulo 2, which means that the pages modulo 2 are alternately counted as page 0 (modulo 2) and page 1 (modulo 2).
Pages with the logical number 0 are turned to the left by 90 degrees and scaled down by a factor of 0.6. They are then shifted to the right by 20 cm and to the top by 2 cm.
To match the above reformatting, pages with the logical number 1 are turned to the left by 90 degrees, and scaled down by a factor of 0.6. They are then shifted to the right by 20 cm and to the top by 15 cm.
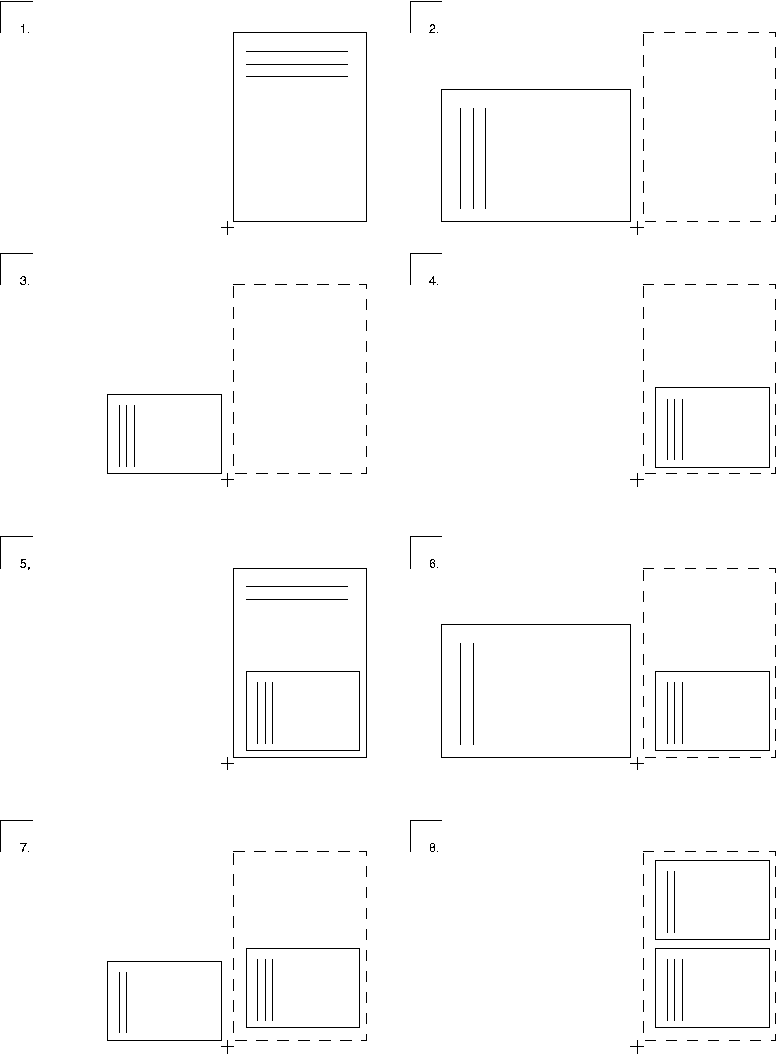
In the case of PostScript files, the origin of the coordinates is located in the bottom left corner of a page in normal orientation, as indicated by the + (see Figure 6.1. “The Individual Steps with pstops”):
One page 0 (modulo 2) with three lines of text.
Rotated to the left by 90 degrees.
Scaled by factor 0.6.
Moved 20 cm to the right and 2 cm up.
Merged with a page 1 (modulo 2) with two lines of text.
After rotating page 1 (modulo 2) to the left by 90 degrees.
After scaling page 1 (module 2) by factor 0.6.
After moving page 1 (modulo 2) 20 cm to the right and 15 cm up.
psselect enables the selection of individual pages. With psselect -p2-5 /tmp/in.ps /tmp/out.ps, pages 2, 3, 4, and 5 are selected from /tmp/in.ps and written to /tmp/out.ps. The command psselect -p-3 /tmp/in.ps /tmp/out.ps selects all pages up to page 3. The command psselect -r -p4- /tmp/in.ps /tmp/out.ps selects the pages from page 4 to the last page and prints them in reverse order.
On a graphical display, the PostScript file /tmp/out.ps can be viewed with gs -r60 /tmp/out.ps. Scroll through the pages by pressing Enter in the terminal window from which you started Ghostscript. Terminate with Ctrl-C.
As a graphical front-end for Ghostscript, use gv. To view the above-mentioned output file, for example, enter gv /tmp/out.ps. The program is especially useful whenever there is a need to zoom in or out on a document or to view it in landscape orientation (although this has no effect on the file contents). It can also be used to select individual pages, which can then be printed directly from within gv.