| SUSE LINUX – User Guide Chapter 5. The KDE Desktop / 5.4. Important Utilities | ||||
|---|---|---|---|---|
 | 5.3. Konqueror as a File Manager | Chapter 6. The GNOME Desktop |  | |
| SUSE LINUX – User Guide Chapter 5. The KDE Desktop / 5.4. Important Utilities | ||||
|---|---|---|---|---|
| 5.3. Konqueror as a File Manager | Chapter 6. The GNOME Desktop | | |
The following pages introduce a number of small KDE utilities intended to assist in daily work. These applications perform various tasks, such as managing your keys for encrypting and signing files and e-mail messages, managing your clipboard, formatting floppy disks, compressing and decompressing diverse file archive types, and sharing your desktop with other users.
To surf the Internet or send and receive e-mail messages, connect a modem or an ISDN or Ethernet card to your machine and configure it. This can be done with the help of the system assistant YaST. As soon as the respective device has been configured correctly, control the Internet dial-up with KInternet.
On start-up, KDE loads KInternet. The program checks whether an Internet connection can be established. If this is possible, the application icon, a plug, automatically appears in the right part of the KDE panel. The following is an overview of the icons and their meanings:

Currently there is no connection to the Internet.

The connection is just being established or terminated.

The connection has been established.

Data is transmitted to or from the Internet.

An error has occurred. If a connection has already been configured with YaST, use to identify the reason for the error. The menu can be accessed by right-clicking the KInternet icon.

The connection is not yet active, but will be established as soon as a request is made.
Right-click KInternet to access a menu for configuring KInternet. To configure your access, select +. After entering the root password, YaST is started. Depending on the access type, start the modem, ISDN, network, or DSL configuration of YaST to select a provider from a list.
KInternet can do even more: if the option Channel Bundling is activated in YaST, a second ISDN channel can be added to an existing connection with . This doubles the transfer rate (although at a higher price). Activate channel bundling if you need to download large files. The activated channel bundling is evident from the red plus symbol at the top left corner of the KInternet icon.
Users who want to establish Internet connections automatically can use dial on demand (DoD). If this mode is selected, KInternet automatically connects to your Internet service provider (ISP) as soon as a request is submitted. After a certain time-out, the connection is terminated. A DoD connection is evident from the blue D at the bottom right corner of the KInternet icon. DoD only makes sense if you have a flat rate Internet account. Otherwise the repeated establishment and termination of the connection can be quite costly.
KGet is the download manager for KDE, similar to GetRight or Golzilla. With KGet, manage your transfers in a window. Stop, resume, delete, and queue transfers and add new transfers.
Start KGet by pressing Alt-F2 and entering the command kget. When the program is started for the first time, a dialog is displayed. Confirm this dialog to integrate KGet in Konqueror. When you close the dialog, KGet is integrated in the system tray of the panel as an icon with a downward arrow.
Click this arrow to open the dialog displaying your transfers. To add a transfer to the list, select the menu item ->. A dialog opens. Enter a URL in the input field and confirm with . Then specify the location for saving the downloaded file. After all information has been entered, the entry for the transfer is added to the main window of KGet and started.
Another way to add a transfer is by means of drag and drop. Simply drag a file (e.g., from an FTP server) from Konqueror and drop it in the main window.
You can also instruct KGet to perform your transfers at a specific time. Activate ->. All transfers inserted from this point are not started immediately but queued. To start the clock, double-click the respective entry. A dialog opens. Select . The dialog is expanded by the settings needed for starting the transfer at a certain time. Enter the day, month, year, and time. Then close the window.
After making the desired settings for all your transfers, set KGet back to the online mode by deactivating ->. The transfers should start at the specified times.
SuSEWatcher is a program that is integrated in the system tray of the panel. It checks for new updates and new hardware. To be able to find any new updates, it requires an online connection. The program SuSEWatcher is located in the package kdebase3-SuSE. The status of SuSEWatcher is displayed by means of colorful icons in the panel.
When you click the icon in the panel, a window opens, informing you about the status of your online updates and the availability of any new updates. You can also launch the check manually by clicking . Start the online update by selecting and entering the root password. The YaST Online Update window is displayed.
The KDE program Klipper serves as a clipboard for selected text, normally marked by keeping the left mouse button pressed. This text can be transferred to another application by moving the mouse pointer to the target location then pressing the middle mouse button (on a two-button mouse, press both buttons simultaneously). The text is copied to the selected location from the clipboard.
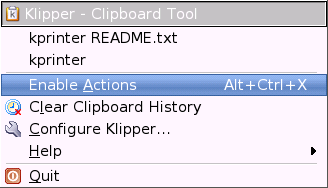
By default, Klipper is started when KDE is loaded and appears as a clipboard icon in the panel. View the contents of the clipboard by clicking this icon. The Klipper context menu and the last seven entries, also referred to as the history, are displayed (see Figure 5.4. “The Clipboard Klipper”). If an extensive text was copied to Klipper, only the first line of the text is displayed. The most recent entry is listed on top and is marked as active with a black check mark. To copy an older text fragment from Klipper to an application, select it by clicking it, move the mouse pointer to the target application, and then middle-click.
As well as the contents of the clipboard, the context menu features the following menu items:
If you click this, a black check mark is displayed in front of it. For example, if you mark a URL with the mouse when actions are enabled, a window opens, enabling you to select a browser for displaying this URL. Click to disable this function.
Deletes all entries from the clipboard.
This opens the Klipper configuration dialog. Klipper can be customized in many ways. Control the program with keyboard shortcuts or use regular expressions. Check the Klipper handbook for details. Former Windows users may appreciate the option for activating the keyboard shortcuts Ctrl-C and Ctrl-X for cutting and Ctrl-V for pasting under the tab. To use this feature, activate the entry in . Subsequently, use the mouse or the keyboard shortcuts to which you are accustomed.
This item opens a submenu from which to open the Klipper handbook, send a bug report to the developers, and view information about Klipper and KDE.
If you click , a dialog is displayed asking whether Klipper should be started automatically the next time you log in. If you click , start the program from the main menu the next time you want to use it. If you click , the program will not be terminated.
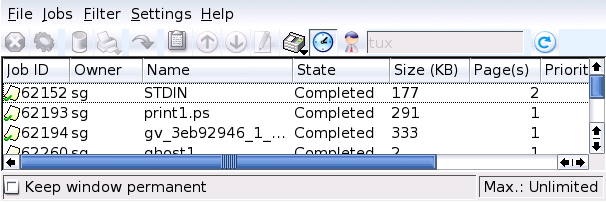
Start KJobViewer from the main menu or with the command kjobviewer from the command line. This program assists with monitoring print jobs. Print jobs are placed in a queue, from which they are sent to the printer consecutively. As long as your jobs are not printed, edit them with the menu or by clicking the respective icon. See Figure 5.5. “Monitoring Print Jobs with KJobViewer”.
If, for example, you want to check if you sent the correct document to the printer, you can stop the job and resume it if you decide to print it. Remove your own print jobs from the queue with . To change the printer, select a different printer with .
With , reprint a document. To do this, select from the menu, select the desired document, and click in the menu. contains the technical details of a job. Use and to set the priority, depending on how quickly you need the document.
enables you to switch between various printers, toggle completed jobs, and limit the view to your own print jobs by selecting . The current user will be displayed in the top right field.
+ opens a configuration dialog. Here, determine the maximum number of print jobs to display. Enter a number in the field or use the slider to the right to determine a value. Press to save the setting or to exit the dialog without saving.
The icons in the toolbar correspond to the functions you can access by way of the menu. A help text explaining the function is displayed when you move the mouse pointer over one of the icons.
The job list consists of eight columns. The job ID is automatically assigned by the print system to identify the various jobs. The next column contains the login of the user who sent the job followed by the file name of the document. The status column indicates whether a job is still in the queue, currently being printed, or already completed. Next, the size of the document is displayed in kilobytes and number of pages. The default priority of 50 can be increased or reduced if necessary. Billing information can be cost centers or other company-specific information. If you right-click a job in the list, the menu opens under the mouse pointer, allowing you to select an action. Only a few functions are available for completed jobs. If you activate , KJobViewer window opens automatically when you log in the next time. You can also start KJobViewer using the printer icon in the panel.
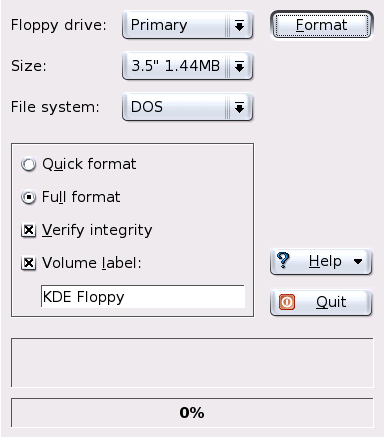
KFloppy is the floppy disk formatter of KDE. Start the program from the main menu or from the command line with the command kfloppy. KFloppy opens a dialog, shown in Figure 5.6. “The Floppy Disk Formatter KFloppy”, in which to specify a number of settings. Under , select the primary or the secondary drive, provided your machine has two floppy disk drives. The default setting for the size is , which is the most commonly used floppy disk type. The setting for the file system is very important. Choose between the Linux format ext2 and MS-DOS. If you select MS-DOS, you will be able to read and write the floppy disk on a Windows machine.
In the center, select or . The quick format procedure merely rewrites the file system and deletes all data. The full format procedure rewrites all tracks and sectors and is able to detect and mark bad sectors. Sectors marked as bad are not used for writing data. Select to have the formatting checked and verified upon completion. If you activate , designate a name for the floppy disk in the input field below.
After making all settings, click . You will be warned that all data on the disk will be lost and prompted to confirm. KFloppy informs you if any problems occur during the formatting procedure, including information about any bad sectors.
Click to access a short menu that offers the KFloppy handbook. Additionally use it to send a bug report or other concerns to the developers of KFloppy. Selecting accesses information about the version, authors, translation, and license. provides information about KDE and web pages of the KDE developers. Exit KFloppy by clicking .
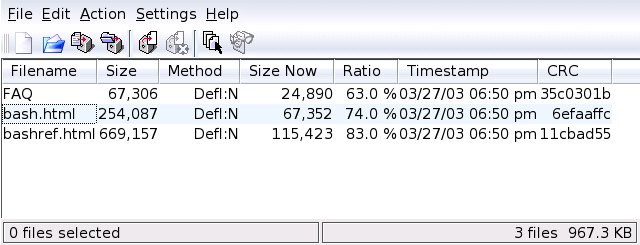
To save space on the hard disk, use a packer that compresses files and directories to a fraction of their original size. The application Ark can be used to manage such archives. It supports common formats, such as zip, tar.gz, tar.bz2, lha, rar, and zoo.
Start Ark from the main menu or from the command line with the command ark. If you already have some compressed files, move these from an open Konqueror window to the Ark window to view the contents of the archive. To view an integrated preview of the archive in Konqueror, right-click the archive in Konqueror and select . Alternatively, select + in Ark to open the file directly. See Figure 5.7. “Ark: File Archive Preview”.
Once you have opened an archive, perform various actions. offers options such as , , , , , , and .
To create a new archive, select +. Enter the name of the new archive in the dialog that opens. If you enter a file extension, an archive with the specified format is generated. If you omit the extension, .zip is used as the default.
After you have entered the archive name, an empty window is displayed. Move files or directories into this window from Konqueror. Ark compresses and lists the files. For more information about Ark, go to +.
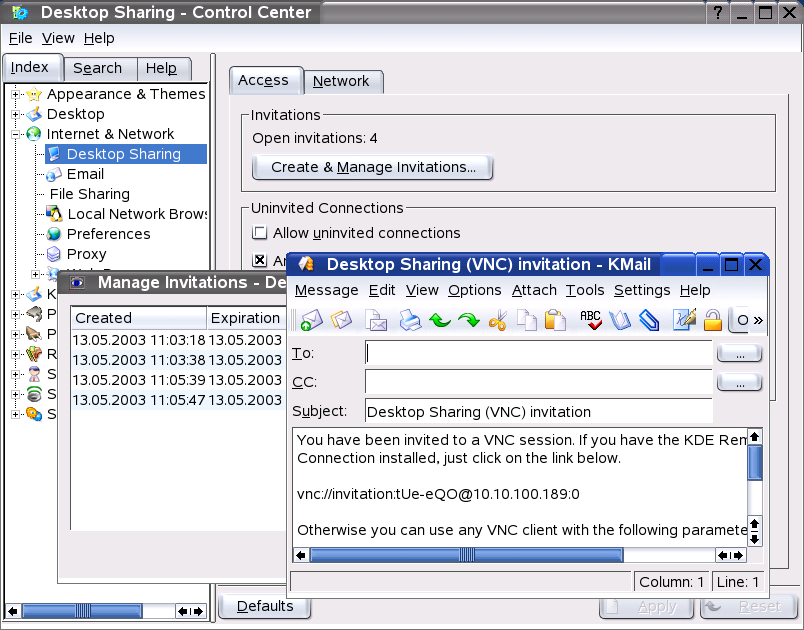
You can share your desktop for use by other users on their hosts. Desktop sharing makes use of the RFB protocol, more commonly referred to as VNC. This feature enables a Linux desktop to be made available for clients using other operating systems, provided they support VNC.
To grant trustworthy users access to your desktop, send them a password. This can be done by means of an invitation. Start the Control Center from the main menu and select in the module.
Click and choose between and . If you click , an invitation indicating the IP address of the host, password, and expiry of the invitation is generated. Send this data manually to the respective person. If you click , all required data is transmitted by e-mail. KMail starts automatically and generates an e-mail message with the needed data (host, password, and expiry). At the end of the e-mail, a link, which the recipient of the message merely needs to click to view your desktop in a browser, is provided. Simply enter the e-mail address of the recipient and modify the standard text, if necessary. Then send the message. Refer to Figure 5.8. “Desktop Sharing with Invitation by E-Mail”.
Use to revoke all invitations. To delete an individual invitation, select it then click .
If an invited person requests a connection, KDE informs you about this request. Decide to accept or deny the connection. If you accept the connection, also use the check box to release the keyboard and mouse control. For security reasons, the maximum duration for a connection is one hour.
To change the default settings, start the via in the main menu. In the left frame, select +. Various configuration options are available in the lower part of the window. However, for security reasons you should not modify the default settings.
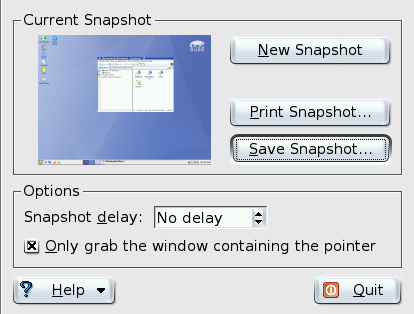
With KSnapshot, create snapshots of your screen or special applications. Start the program from the main menu or from the command line with the command ksnapshot. The dialog window of KSnapshot consists of two parts (see Figure 5.9. “Taking Screenshots with KSnapshot”). The upper area () contains a preview of the current screen and three buttons for creating and saving the screenshots. In the lower part of the window, determine further options for the actual creation of the screenshot.
To take a screenshot, use to determine the period in seconds to wait between the click on and the actual creation of the screenshot. If is active, only the window containing the pointer is “photographed.” To save the screenshot, click and designate the directory and file name for the image in the following dialog. Use to print the screenshot.
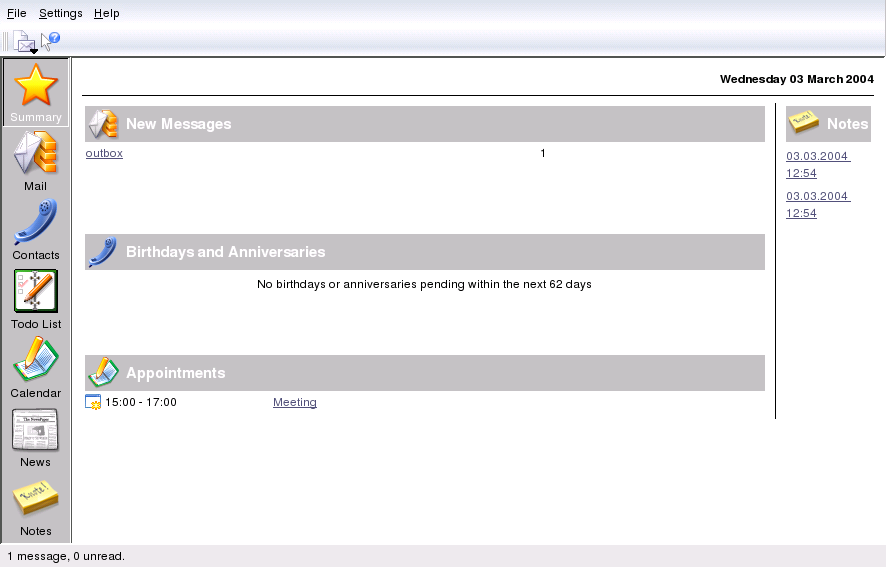
The application Kontact bundles the display of e-mails, notes, contacts, news, weather, and a calendar into one window. Open it by pressing Alt-F2 and entering kontact. See Figure 5.10. “Kontact”.
In ->, select which components should appear in the window.
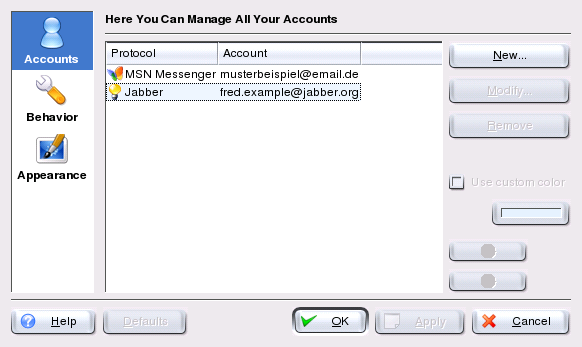
Kopete is an online messenger application allowing multiple partners connected to the Internet to chat with each other. Kopete currently supports all common messenger protocols, such as ICQ, MSN, Yahoo, SMS, Jabber, and IRC.
Configure Kopete by entering your personal user data. Click +. shows all currently available protocols. Check the desired connection type to activate it.
With , enter your user data. You must register with a provider offering instant messaging services before using such service. Click to open a configuration assistant that can assist you in completing your user profile.
The next step lists the avilable messaging services. Select the service with which you have registered and click . In the next step, enter the user data received upon registration with the messaging service. This usually consists of the nickname or e-mail address and the password you chose. Complete the configuration of the messenger account by clicking .
The next item in the configuration dialog is . It influences how Kopete is displayed. The tab provides a selection of various types of smileys.
The tabs and offer the possibility to adjust the appearance of the chat windows for communication with other participants. Choose between the classic themes of the corresponding providers or to create a custom theme by adjusting the font or color to personal preference.
It is necessary to add contacts in order to chat with a participant. If you have already created an account on another PC, this data is readily imported and automatically added to your contact list. To create a contact entry manually, click +.
A new assistant appears automatically that will accompany you until completion. However, consider that must be online to add a contact to your list.
Access this with ->. Name the group and confirm this with . A new folder appears in the contact list that can be used to store the desired contacts. You can drag and drop contacts into the desired folder. This allows grouping contacts for a better overview.
It is necessary to establish a connection to the Internet to be able to chat with other participants. When this is done, clicking ->-> then establish a connection between Kopete and the selected messaging service.
The main application windows features a list of contacts. When you right-click a contact marked as online, a menu opens with various options. Send that person a message or start a chatting session. A chat allows invitation of other participants for real-time discussion. The connection to all other participants is closed when the creator of the chat session leaves the room first.
Files can be transferred comfortably with an instant messenger by right-clicking a user and then clicking his name. Many options, like , , , and , can be found here. Clicking opens a dialog for selecting the desired file. Confirming with sends a dialog to the receiving user asking whether he wants to accept the file. If he accepts, the file transfer starts.
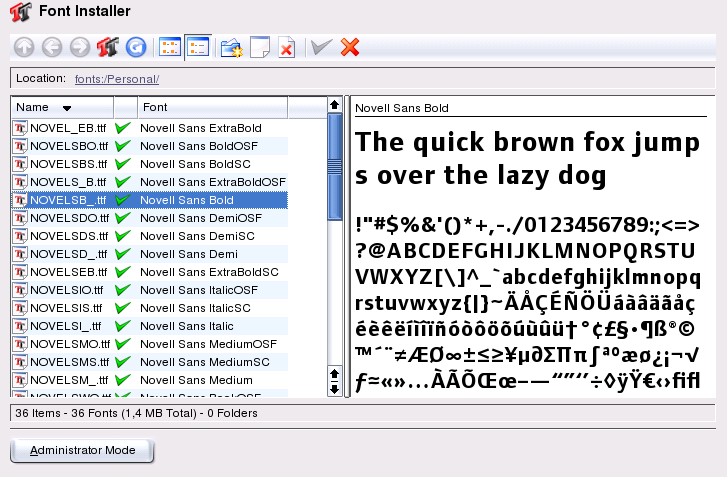
By default, SUSE LINUX provides various fonts commonly available in different file formats (Bitmap, TrueType, etc.). These are commonly known as System Fonts. Users can additionally install their own fonts from various collections on CD-ROM. Such user-installed fonts are, however, only visible and available to the corresponding user.
The KDE control center provides a comfortable tool for administering system and user fonts. It is shown in Figure 5.13. “Font Administration from the Control Center”.
To check which fonts are currently available, type the URL fonts:/ into the address field of a Konqueror session. This displays two windows: Personal and System. User-installed fonts are installed to the folder Personal. Only root can install to the System folder.
To install fonts as a user, follow these steps:
Start the Control Center and access the appropriate module with ->.
Choose Add Fonts from the icon bar or from the menu available when right-clicking the list.
In the dialog that opens, select one or more fonts for installation.
The marked fonts are then installed to your personal font folder. Selecting a font shows a preview.
To update system fonts, first select and enter your root password then proceed as described for user font installation.
The feature for deactivating installed fonts is very useful. They are not removed but are made unavailable to the system. Select the icon or its counterpart from the context menu. This makes the green checkmark disappear. The new settings become active after confirmation with . The deactivated fonts are then no longer available to applications. This reduces the size of font lists displayed in applications.