| SUSE LINUX – User Guide Chapter 24. Manipulating Graphics with The GIMP / 24.2. Starting The GIMP | ||||
|---|---|---|---|---|
 | Chapter 24. Manipulating Graphics with The GIMP | 24.3. Getting Started in GIMP |  | |
| SUSE LINUX – User Guide Chapter 24. Manipulating Graphics with The GIMP / 24.2. Starting The GIMP | ||||
|---|---|---|---|---|
| Chapter 24. Manipulating Graphics with The GIMP | 24.3. Getting Started in GIMP | | |
Start GIMP from the main menu. Alternatively, enter gimp & in a command line.
When starting GIMP for the first time or the 2.0 version for the first time, a configuration wizard opens for preparatory configuration. The default settings are acceptable for most purposes. Press in each dialog unless you are familiar with the settings and prefer another setup.
Three windows appear by default. They can be arranged on the screen and, except the toolbox, closed if no longer needed. Closing the toolbox closes the application. In the default configuration, The GIMP saves your window layout when you exit. Dialogs left open reappear when you next start the program.
This small window opens with useful tips and tricks each time the program starts. Reading the tips is recommended for new users. Uncheck to disable it. This setting can also be changed in the preferences. Press to close the window.
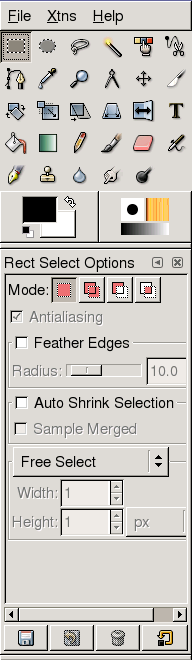
The main window of The GIMP, shown in Figure 24.1. “The Main Window”, contains the main controls of the application. Closing it exits the application. At the very top, the menu bar offers access to file functions, extensions, and help. Below that, find icons for the various tools. Hover the mouse over an icon to display information about it.
The current foreground and background color are shown in two overlapping boxes. The default colors are black for the foreground and white for the background. Click the box to open a color selection dialog. Swap the foreground and background color with the bent arrow symbol to the upper right of the boxes. Use the black and white symbol to the lower left to reset the colors to the default.
To the right, the current brush, pattern, and gradient are shown. Click the displayed one to access the selection dialog. The lower portion of the window contains the dialog. It allows configuration of various options for the current tool.
In the first section, use the drop-down box to select the image to which the tabs refer. By clicking , control whether the active image is chosen automatically. By default, is enabled.
shows the different layers in the current images and can be used to manipulate the layers. Information is available in Section 24.6.1. “Layers”. shows and can manipulate the color channels of the image.
Paths are an advanced method of selecting parts of an image. They can also be used for drawing. shows the paths available for an image and provides access to path functions. shows a limited history of modifications made to the current image. Its use is described in Section 24.5.5. “Undoing Mistakes”.
The bottom portion of the window contains three tabs. With them, select the current brush, gradient, and pattern.