| SUSE LINUX – User Guide Part I. Configuration / Chapter 1. The KDE Desktop | ||||
|---|---|---|---|---|
 | Part I. Configuration | 1.2. Settings |  | |
| SUSE LINUX – User Guide Part I. Configuration / Chapter 1. The KDE Desktop | ||||
|---|---|---|---|---|
| Part I. Configuration | 1.2. Settings | | |
Table of Contents
Abstract
The KDE desktop offers an intuitive graphical interface. The following sections show you how to make efficient use of KDE's features and how to customize the desktop to meet your personal needs. This is followed by an introduction to the file manager Konqueror and a brief description of some small but useful utilities.
The main components are the icons on the desktop and the panel at the bottom of the screen. The mouse is your most important tool. Click a symbol or an icon once to start the associated program or the file manager Konqueror. If you right-click an icon, different menus appear, depending on the program. As well as the icons, there are two desktop menus.
If you middle-click the desktop (if your mouse only has two buttons, press both buttons at the same time), a window and desktop management menu is displayed. The menu lists the various desktops and the windows opened in them. Click one of the following menu items:
If you have several windows on your desktop, they are placed next to each other and aligned with the top left corner.
Starting from the top left corner, the windows on the desktop are placed on top of each other in such a way that only the top and left borders of the lower windows are visible.
Desktop 1 is your default desktop. This part of the menu lists all the windows currently opened. You can bring them to the foreground by clicking one of the respective items.
You can use the additional (virtual) desktops provided and switch to them with the menu or the panel. All functions are available on all desktops. This limits the number of programs and associated windows that need to be arranged on one desktop. These virtual desktops resemble additional desks in your office.
If you right-click the desktop, a more complex menu is displayed, allowing you to customize your desktop.
Use this menu item to create new directories, files, or devices on the desktop. A list of possible elements is provided for selection in a submenu.
The bookmark editor allows you to create, group, change, or delete bookmarks. The bookmarks are used by the browser and file manager Konqueror. The bookmark editor also allows you to import bookmarks from other browsers, such as Mozilla, Netscape, Opera, and Internet Explorer.
This menu item opens a window in which to enter a command manually. The command is executed after pressing Enter.
Use this item to undo the last action. For example, if you have just created a new directory on the desktop, clicking this item reverts the creation so the directory disappears.
To keep a folder or document handy on the desktop, you can copy an icon from the file manager by right-clicking and selecting then moving the mouse to the desired location on the desktop. Right-click again and select . The icon is now available on your desktop and can be moved around by dragging it with the left mouse button pressed.
This allows you to rearrange the icons on the desktop. You can also change the order of the icons.
This arranges the windows on the desktop, either on top of each other begining from the top left corner or next to each other.
If the desktop should appear garbled in some way, use this menu item to redraw it.
This menu item starts a configuration dialog with which to configure the appearance and behavior of the desktop. Details about the configuration of the desktop are provided in 1.2. “Settings”.
This menu opens a dialog box asking if you want to start a new user environment. After clicking , the current session disappears into the background and the system switches to a new login screen. Each session has a function key assigned to it: F7 represents the first session, F8 the second one, and so on. To switch between different sessions, press Ctrl-Alt-Fx, where Fx is the function key corresponding to the desired session.
If you leave your workstation and do not log out, you should use this function to prevent others from gaining access to your files. Depending on the setting, the screen turns blank or starts displaying a screensaver. To continue using the computer, enter your password.
Log out of your system if you are not going to use the system for some time.
The trash bin is a directory for files marked for deletion. Drag icons from the file manager or the desktop to the trash bin icon by keeping the left mouse button pressed then release to drop them there. Alternatively, right-click an icon and select from the menu. Click the trash bin icon to view its contents. You can retrieve an item from the trash if desired.
Files removed with are not kept in the trash bin, but permanently deleted right away. To permanently delete the files in the trash bin itself, right-click the trash bin icon and select .
If you click the floppy disk icon when a floppy disk is inserted, the file manager starts and displays the content of the floppy disk. Display a context menu with various options by right-clicking the individual icons on the floppy disk. It is also possible to move the icon to a different location, such as the desktop or your home directory, by simply keeping the left mouse button pressed over it and dragging it to the destination. You will be asked whether you want to move or copy the file or create a link. The same technique can be used to copy or move files from your home directory to the floppy disk.
Right-click the floppy disk icon to access the context menu. is a very important option. Be sure to unmount the drive before removing a floppy disk from the drive, because this is necessary to trigger the actual writing of the data to the floppy disk.
The handling of CDs and DVDs is similar, with the only difference that these media are not writable. Despite this, you must unmount CD and DVD drives, because otherwise you will not be able to remove the disk from the drive. You can also select , which causes the medium to be unmounted and ejected. Both methods only work if the CD or DVD is no longer accessed and any file manager window displaying the content of the CD or DVD has been closed.
Right-click the printer icon and choose +. The KPrinter dialog window starts. This program enables you to adjust a number of settings and send print jobs directly. The upper part of the main window, like that in Figure 1.1. “The Main Window of KPrinter”, shows the selected printer. To switch to another printer, click the arrow next to the printer name and select the device to use from the list displayed.
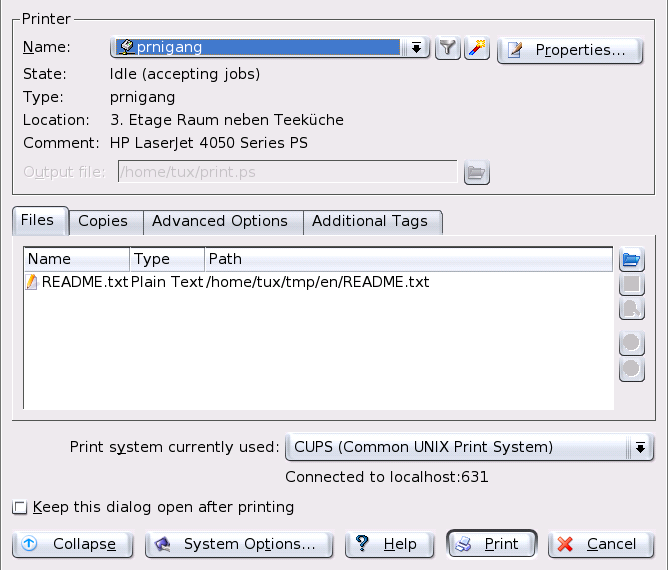
To configure the selected printer, click . A configuration dialog like that shown in Figure 1.2. “Settings in KPrinter” opens, enabling you to change the paper format (e.g., from A4 to letter) or to select a different paper tray. Changing trays is especially useful if one of the trays contains letterhead paper and another contains plain white paper.
Under , choose between and and whether the pages should be turned 180 degrees so that they are printed upside down. To the right of , specify the settings for two-sided printing. If is selected, only one page is printed per sheet. If you select , the front and back are printed like in a book. With , the back is printed reversely and you must turn the sheet up to view the text correctly. With , specify whether your document should have start or end banners, such as “confidential” or “secret”. Under , select to print two or four pages on one sheet. For this purpose, the pages are downsized accordingly. If you click , your settings are saved and used again for the following print jobs. However, if you click , the settings only apply to the current job. If you close the dialog with , all changes are discarded.
After making all settings, click . The second part of the window now becomes visible. Click the blue folder icon. By default, your home directory is displayed. Select a file and confirm with . You can also select the file by double-clicking it. The respective file then appears in the overview of the main window, together with the name, type, and path specification. Now click to send the job to the printer. The job is placed in the queue and can be monitored with KJobViewer. On the other hand, if you click the document, two additional buttons become active to the right. Use the X button to remove the document from the selection or use the magnifying glass icon to display, edit, and save the file with Kwrite or OpenOffice.org (depending on the document type). Afterwards, simply close the editing program and click in the KPrinter dialog. The printout will reflect any changes made to the document while editing.
All KDE applications use KPrinter for printing. For example, if you click the printer icon in KWrite, the KPrinter dialog appears. The file to print is already preselected.
The panel at the lower edge of the screen consists of several areas. By default, the icon for the main menu is located to the far left. Other icons are next to it. The house icon provides quick access to your home directory with all subdirectories. The other icons start applications, such as OpenOffice.org, K-Mail, and the web browser Konqueror, if these programs were installed.
Next to these icons are the numbered buttons with which to switch desktops. These multiple desktops enable you to organize your work if you use many programs simultaneously, as if you had several desks for various tasks.
The taskbar is located next to the virtual desktops. All started applications are displayed in the taskbar. If you click a window title in the taskbar, the application is moved to the foreground. If it is already in the foreground, clicking minimizes the application. If you click it again, it reopens. Next to the taskbar, find applets, such as the clipboard Klipper, SuSEwatcher, and any other applets you have started. The clock helps you keep track of the time.
If you right-click an empty space in the panel, a menu providing the usual help and configuration options for the panel is displayed. Use the menu to change the size of the panel and to add or remove applications. To add an application, search for it in the menu and select it. Remove applications or applets by right-clicking the corresponding icon and selecting from the displayed menu.
Open the main menu by clicking the icon to the far left of the panel. Alternatively, press Alt-F1. The main menu is subdivided into these sections: Recently Used Applications (or ), All Applications (a menu with all applications sorted according to categories), and Actions. The following section provides information about a number of actions that can be triggered from the main menu. Detailed information about the Control Center is available in 1.2. “Settings”.
By selecting from this menu, start an editor in which to organize your bookmarks. If you select one of the bookmarks present in the menu, the Konqueror browser starts and loads the corresponding URL.
This item opens a dialog where you can enter a command. You can use it to quickly start an application whose command you know — without having to navigate through the program submenus.
To start a second session with a graphical user interface on your machine, select from the main menu. Your current session remains active while you are taken to the login screen. Log in. You can also start another window manager. Access the first session by pressing Ctrl-Alt-F7. Press F8 instead of F7 to access the new session. Additional sessions can be accessed by pressing Ctrl-Alt-F9 to F12.
If you leave your workstation, you can blank your screen or start a screensaver. Access to the session can only be regained with a password. To unlock, enter your normal login password. Locking the screen ensures that others cannot read or manipulate your documents or e-mail messages.
You can log out from the system by means of this menu item. However, first you will be asked what should happen after the logout. If you select , the login screen is displayed, allowing you or another user to log in to the system. You can also shut down and turn off the computer or shut it down and reboot immediately. Confirm your selection with or remain logged in by clicking .