Chapter 1. First Contact / 1.9. Networking and Mobility | ||||
|---|---|---|---|---|
 | 1.8. Security | 1.10. Using the Shell |  | |
Chapter 1. First Contact / 1.9. Networking and Mobility | ||||
|---|---|---|---|---|
| 1.8. Security | 1.10. Using the Shell | | |
GNOME and KDE offer several applications for working in a network environment or using a mobile computer. It is much more convenient and much easier to click a small icon to connect to or disconnect from a network than to manually run some script. Monitoring the power state of your mobile computer via a small icon is easier than watching obscure system messages. The following sections introduce some of these little helpers, but many more are offered by your desktop environment.
Network connections, even wireless ones, can be easily configured and monitored by small applications seamlessly integrating into your desktop panel. KInternet can be used to configure and monitor any kind of network connection. Network Monitor in GNOME and Wireless Network Information in KDE can be used to monitor the state of your wireless link.
![[Important]](admon/important.png) | Network Configuration |
|---|---|
The initial configuration of any network connection is made with YaST, the SUSE LINUX configuration management tool. Find information about this in the Administration Guide. | |
After your network devide has been configured correctly, control the Internet dial-up with KInternet. On start-up, KDE loads KInternet. The program checks whether an Internet connection can be established. If this is possible, the application icon, a plug, automatically appears in the right part of the KDE panel. Depending on the state of the network connection, the panel icon changes appearance:

Currently there is no connection to the Internet.

The connection is just being established or terminated.

The connection has been established.

Data is transmitted to or from the Internet.

An error has occurred. If a connection has already been configured with YaST, use to identify the reason for the error. The menu can be accessed by right-clicking the KInternet icon.

The connection is not yet active, but will be established as soon as a request is made.
Right-click the KInternet panel icon to access its configuration menu. The YaST configuration dialog can be started via +. After entering the root password, YaST starts. Depending on the access type, start the modem, ISDN, network, or DSL configuration of YaST.
If you are using an ISDN connection and you have selected in YaST, a second ISDN channel can be added to an existing connection with . This doubles the transfer rate (although at a higher price). Activate channel bundling if you need to download large files. The activated channel bundling is evident from the red plus symbol at the top left corner of the KInternet icon.
If your computer has more than one network device and you have configured all of them with YaST, you can use the KInternet option to switch between these interfaces. You must have selected device activation in the appropriate YaST network dialog to do this. If you have multiple providers as well, choose them using the switch of KInternet. Providers are also set in YaST.
Users who want to establish Internet connections automatically can use dial on demand (DoD). If this mode is selected, KInternet automatically connects to your Internet service provider (ISP) as soon as a request is submitted. After a certain time-out, the connection is terminated. A DoD connection is evident from the blue D at the bottom right corner of the KInternet icon.
![[Warning]](admon/warning.png) | Cost Control |
|---|---|
Note that DoD only makes sense if you have a flat rate Internet account. If that is not the case, connecting and disconnecting all the time can become very costly. | |
If you intend to use a wireless network card as your connection to the Internet, configure it using YaST as described in the Administration Guide and make sure that the device activation in YaST is set to . As soon as the interface is configured, you can use KInternet to control your wireless network connection, just as you would for normal network interfaces.
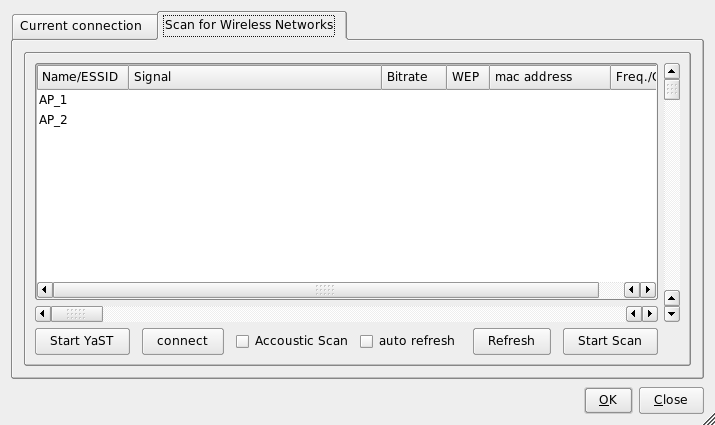
To access the WLAN functionality of KInternet, right-click the icon to open the menu. Select and a window showing two tabs opens. First, scan for suitable wireless networks you could connect to. Select the tab , shown in Figure 1.7, “KInternet: Scanning for Wireless Networks”.
Start the scan with . For KInternet to continuously scan the network environment, also select . Acoustic feedback for each connection found can be activated via . Any connection found is displayed in the list window. Select one and click to connect to the selected network. If additional configuration efforts are needed to connect to the selected network, click to launch the YaST network module for wireless network devices.
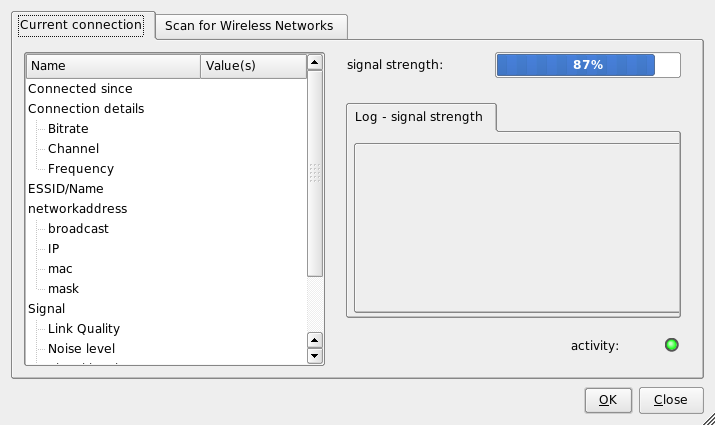
The tab allows you to monitor the state of your current wireless connection. The left-hand view of this tab offers a summary of all connection parameters regarding network address and ESSID, signal quality, signal and noise level, channel frequency and speed, and encryption parameters, such as type of encryption and key length. Select any of these parameters in the tree structure and check the details displayed in the right part of the window.
Add Network Monitor to your GNOME panel to get visual feedback on the quality of your wireless connection. Right-click the panel icon and select to set the monitor to the correct device if you have more than one wireless device connected to your machine.
Add Wireless Network Information to your KDE panel to monitor the state of your wireless connection. Clicking the panel icon reveals the details of your wireless connection, including network name (ESSID), link quality, signal strength, noise level, bit rate, and encryption method. If you have more than one wireless device, switch between them using the drop-down menu at the top right. If you touch the panel icon with the mouse cursor, a tool tip opens showing device name, link quality, and current bit rate.
Working on a mobile computer requires a great deal of flexibility in adjusting to changing network and system environments. SUSE LINUX offers small helpers, like GNOME Battery Charge Monitor, KPowersave, and Profile Chooser, which assist you in adjusting the power management scheme and the system configuration of your computer.
![[Tip]](admon/tip.png) | More Information about Mobile Computing |
|---|---|
Refer to the Administration Guide to learn more about mobile computing under SUSE LINUX. Get an introduction to the software components involved and learn how to configure your mobile devices for maximum flexibility. | |
Successfully working on battery power requires a very sophisticated handling of the system resources by the operating system. Mobile hardware is optimized to allow a very flexible management of power usage by the CPU and other components. Depending on the environment in which the system is run, the power management can easily be adjusted in SUSE LINUX using GNOME Battery Charge Monitor or KDE KPowersave.
Battery Charge Monitor allows you to send your machine into a hibernation state () in which the entire system state is written to disk prior to shutdown. Once reactivated, this state is recovered. Configure the power management settings via . The YaST Power Management module is launched enabling you to configure all power management settings centrally.
Using KPowersave, you can start the YaST Power Management module and issue both a suspend to disk or a suspend to RAM (if configured accordingly with YaST). You may change the CPU frequency policy, meaning your system either lets the CPU frequency drop when the system is idle and adjusts it dynamically if more CPU power is needed (set the CPU frequency policy to ), permanently keeps a low CPU frequency to save power (select ), or permanently keeps a high CPU frequency for maximum CPU performance (select ). If you change the active power management scheme (), all components of your system are part of the powersaving effort. A power management scheme includes settings for CPU frequency scaling, throttling, hard disk control, and for the cooling of the system. To start this program in a GNOME environment, enter kpowersave at the terminal.
Your system needs to adapt to changing operating environments when used
for mobile computing. A lot of services depend on the environment and the
underlying clients must be reconfigured. Use the system configuration
profile management (SCPM) framework to create different configuration
profiles for all environments your machine is used in. Change the active
profile using Profile Chooser. To modify your SCPM
settings, select
and enter the root password when
prompted to do so. Start Profile Chooser in KDE using the main menu. In
GNOME, enter profile_chooser at the terminal.