| ALSA and MIDI | ||
|---|---|---|
 | Chapter 18. Sound in Linux |  |
| Compressing Audio Data | MIDI Playback without a WaveTable Card | |
| ALSA and MIDI | ||
|---|---|---|
| | Chapter 18. Sound in Linux | |
| Compressing Audio Data | MIDI Playback without a WaveTable Card | |
Apart from the possibility to play PCM data, many sound cards also offer MIDI functionality. The ALSA MIDI sequencer implements an efficient architecture for routing MIDI data. You need pmidi, aseqview, vkeybd, awesfx, snd_sf2, and kalsatools.
Many sound cards have an external MIDI port for connecting MIDI devices, such as synthesizers, keyboards, and sound modules. If the MIDI port of the card is supported by ALSA, use a sequencer application, such as jazz, to record and play MIDI files. An overview of the MIDI devices provided by your card is available in the KDE Control Center under -> -> . Here, also determine the devices to use for playing MIDI files. On the command line, list the available MIDI devices and their internal ALSA port numbers with the command pmidi -l. For a Soundblaster Live! card, the listing would appear as in Output Example 18.1.
Example 18.1. MIDI Devices of a Soundblaster Live! Card
     Port     Client name                       Port name
     72:0     External MIDI 0                   MIDI 0-0
     73:0     Emu10k1 WaveTable                 Emu10k1 Port 0
     73:1     Emu10k1 WaveTable                 Emu10k1 Port 1
     73:2     Emu10k1 WaveTable                 Emu10k1 Port 2
     73:3     Emu10k1 WaveTable                 Emu10k1 Port 3
The first column lists the internal port numbers by which the device is addressed by the ALSA driver. The other columns show the designation and port name of the device. Apart from the external MIDI port, several WaveTable ports are listed. Use a command like pmidi -p 73:0 mysong.mid to play a MIDI file over one of the listed ports.
If a MIDI player is interrupted during playback, a continuous sound may persist. If this happens, run the all_notes_off script or restart ALSA as root with rcalsasound restart.
Many sound cards (like Soundblaster AWE and Live!) have an internal WaveTable synthesizer that converts MIDI events into audible sounds. These MIDI events can be sent to the WaveTable synthesizer by an external MIDI keyboard or by a program, such as a MIDI player or sequencer. For Soundblaster AWE and Live! cards, the WaveTable synthesizer must be initialized with a sound font before any sound can be heard.
The awesfx contains the sfxload command for loading sound fonts in Soundblaster AWE and Live! cards. Suitable sound font files are available on the driver CD of your sound card. The start-up script of ALSA can automatically load the sound fonts required for the WaveTable synthesis, provided the respective files were installed from the Creative driver CD using YaST. Currently, the script only works for one sound card. However, ALSA can easily manage up to eight sound cards.
Sound fonts can be loaded with a command like sfxload -D <n> /usr/share/sfbank/creative/8MBGMSFX.SF2. n stands for the number of the sound card (0, 1…). This may not be the number under which the sound card was configured. This number is instead determined by the order in which the individual sound drivers are loaded.
You can also load one of the sound fonts installed in /usr/share/sounds/sf2. The sound font Vintage_Dreams_Waves_v2.sf2 by Ian Wilson contains 128 analog synthesizer sounds and 8 drum sets. It is suitable for SB AWE as well as for SB Live! cards. The ROM sound font gu11-rom.sf2 by Samuel Collins is only suitable for SB AWE cards. It provides an extended general MIDI bank for these cards. Review the copyright files and the documentation in /usr/share/doc/packages/snd_sf2. More sound fonts are available at URLs such as http://www.hammersound.net.
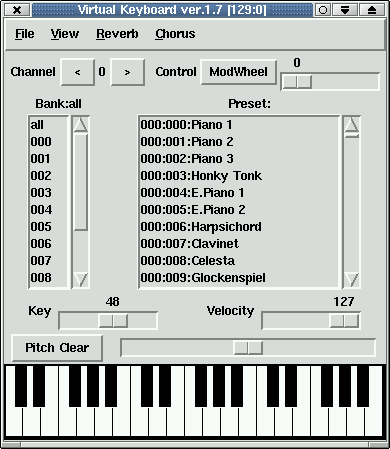
If you do not have an external MIDI keyboard connected to your sound card, use the virtual keyboard vkeybd. For this purpose, the internal port numbers listed with pmidi -l as described above are important. To start the program from the command line, enter vkeybd --addr 73:0 &. The port address must be adapted to your system. Specify the first WaveTable port from the list. If an external sound generator is connected, alternatively specify the port number of the external MIDI port.
vkeybd supports a number of additional options. For example, enter vkeybd --addr 73:0 --octave 5 & to increase the number of displayed octaves to five. An overview of the command line options can be accessed with vkeybd --help or in vkeybd.
The instrument designation in the preset list can be configured by specifying a preset file with the --preset option. Extract the instrument names of a sound font file with the command sftovkb. Change to the respective directory with cd /usr/share/sounds/sf2 and enter the command sftovkb Vintage_Dreams_Waves_v2.sf2 >~/vintage.vkb to save the names in your home directory in vintage.vkb. The vkeybd interface can be configured with the menu.
The mapping of the keys to the sent MIDI notes is saved in the file ~/.vkeybdrc. Additional specifications can be made in this file. To implement your own modifications, retrieve the designations of keyboard events with the xev program.
ALSA provides an efficient infrastructure for the connection of several MIDI ports. Sound cards and MIDI programs (provided these support the ALSA sequencer structure) have one or several MIDI ports for communicating with each other. These ports can be connected with the KDE program kaconnect or the command aconnect. On start-up, kaconnect shows the readable and writable MIDI ports available on your system and their connection status. To test the procedure, start two MIDI programs with the commands vkeybd and aseqview. For the connection between MIDI ports, specify the port address of the program after the program name. For example, assign port number 128:0 to the first program and 129:0 to the second. The ports of the programs are also displayed by kaconnect.
As vkeybd was executed without the --addr parameter, the connection between the program port and the WaveTable port (or the external MIDI) port can now be established manually. To do this, select the respective ports and click . To use the command-line tool aconnect, enter aconnect 128:0 73:0 (or the respective ports) to establish a unidirectional connection between the sender port 128:0 and the receiver port 73:0.
You can now establish a connection between the MIDI port of the keyboard and the MIDI port of the ALSA sequencer viewer. If you modify keyboard settings, such as the panning or the pitch wheel (which must first be activated under ), these changes are promptly reflected in aseqview.
List the ports available for sending and receiving as well as their connection status with aconnect -il or aconnect -ol. Terminate connections established with aconnect with the option -d, for example, aconnect -d 128:0 129:0. To terminate all connections, enter aconnect -x. Get information about other options in aconnect.
aseqnet can be used to establish MIDI connections over a network.
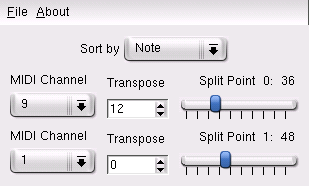
The program QMidiRoute enables flexible MIDI routing. It sorts the MIDI events received on the writeable port according topitch, velocity, or channel and immediately forwards them to the readable ports. Using the parameters and , you can change the channel and pitch of the lower split zone.
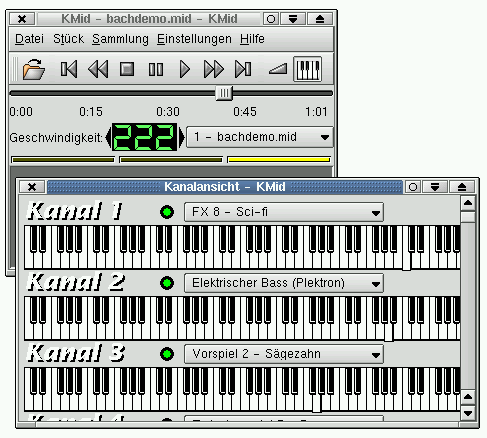
If the kdemultimedia is installed, find in the KDE start menu under . Some demo files for kmid are available in .kar format in the directory /opt/kde2/share/apps/kmid. These files also contain the lyrics, which are scrolled and highlighted in sync with the playback.
Access the detailed online help of kmid with F1. The MIDI ports must be set correctly under -> .
The channel view presented when you click the keyboard button in the tool bar is especially noteworthy. Enlarge the window accordingly to see each channel represented as a piano keyboard. For each channel, select the preferred instrument.
If kmid is started by clicking a MIDI file in the KDE file manager Konqueror, the MIDI settings specified in the KDE Control Center are applied. If the program is started separately, the settings specified in the program itself are applied.
| |  | |
| Compressing Audio Data |  | MIDI Playback without a WaveTable Card |