| SUSE LINUX – User Guide Part III. Office Applications / Chapter 9. Sychronizing a Handheld Computer with KPilot | ||||
|---|---|---|---|---|
 | 8.8. Kate | 9.2. Working with KPilot |  | |
| SUSE LINUX – User Guide Part III. Office Applications / Chapter 9. Sychronizing a Handheld Computer with KPilot | ||||
|---|---|---|---|---|
| 8.8. Kate | 9.2. Working with KPilot | | |
Table of Contents
Abstract
Handheld computers are in widespread use nowadays among users who need to have their schedules, to-do lists, and notes with them everywhere they go. Often users want the same data to be available both on the desktop and on the portable device. This is where KPilot comes in — it is a tool to synchronize data on a handheld with that used by the KDE applications KAddressBook, KOrganizer, and KNotes.
The main purpose of KPilot is to allow the sharing of data between the applications of a handheld computer and their KDE counterparts. KPilot does come with its own built-in memo viewer, address viewer, and file installer, but these cannot be used outside the KPilot environment. Independent KDE applications are available for all these functions except the file installer.
For the communication between the handheld and the different desktop programs, KPilot relies on conduits. KPilot itself is the program that oversees any data exchange between the two computer devices. Using a particular function of the handheld on your desktop computer requires that the corresponding conduit is enabled and configured. For the most part, these conduits are designed to interact with specific KDE programs, so in general they cannot be used with other desktop applications.
The time synchronization conduit is special in that there is no user-visible program for it. It is activated in the background with each sync operation, but should only be enabled on computers that use a network time server to correct their own time drift.
When a synchronization is started, the conduits are activated one after another to carry out the data transfer. There are two different sync methods:
A HotSync operation only synchronizes the data for which any conduits have been enabled.
A backup operation performs a full backup of all data stored on the handheld.
Some conduits need to open certain files during a sync operation, which means the corresponding program should not be running at the given time. Specifically, KOrganizer should not be running during a sync operation.
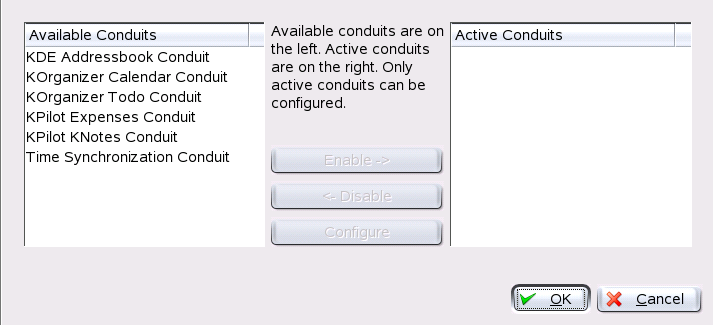
The conduits used by KPilot can be enabled and configured after selecting -> . The following conduits are available:
This conduit handles the data exchange with the handheld's address book. The KDE counterpart is KAddressBook. Start it from the main menu or with the command kaddressbook.
This conduit allows you to transfer notes created with KNotes to the handheld's memo application. Start the KDE application from the main menu or with the command knotes.
This conduits allows you to transfer data from the handheld's expenses program to the desktop computer. Data can be imported as a comma separated list (CSV format) or directly into a PostgreSQL or MySQL database table.
These two conduits are responsible for syncing with the to-do and calendar applications of the handheld. The desktop equivalent for these applications is KOrganizer. For more information, refer to Section 10. Scheduling with KOrganizer.
Enabling this conduit adjusts the handheld's clock to that of the desktop computerduring each sync operation.This is only a good idea if the clock of the desktop computer itself is corrected by a time server at fairly frequent intervals.
Apart from setting up the physical link, there is also some manual configuration necessary on the software side. The configuration depends on the type of cradle (docking unit) used with the handheld. There are basically two types of these: USB cradles and serial cradles. The connection can be configured either on a system-wide basis by the administrator (the root user) or by a regular user for his personal environment.
To set up the connection with the handheld cradle, select -> . First, specify the correct device file under . If you have a USB cradle, enter /dev/ttyUSB0. If you have a serial cradle connected to the first or second serial port, enter /dev/ttyS0 or /dev/ttyS1, respectively. The connection speed should normally be set to 57600. Also provide the user name set on the handheld in the corresponding field. The program checks that the name actually matches the user name on the handheld when you first sync with it. The configuration dialog is shown in Figure 9.2. “Configuring the Connection in KPilot”.
There should be no need to create a /dev/pilot link if you have configured the cradle connection as a regular user. As a handheld cradle is normally connected to one specific computer, possibly with several users on it, it may still be useful to configure the connection with administrator permissions.
![[Important]](admon/important.png) | Important |
|---|---|
The following configuration steps require administrator permissions and cannot be performed from a regular user account. After completing the steps as described below, add users to the uucp group to allow them to use KPilot. | |
To connect over a USB cradle, create a symbolic link from /dev/ttyUSB? to /dev/pilot. To to so, first check to which USB bus the cradle is connected. If you do not have any other USB devices on the same first USB bus, it can be safely assumed that this is /dev/ttyUSB0. In this case, the command to create the symbolic link would be as follows:
ln -s /dev/ttyUSB0 /dev/pilot
First, determine to which port the cradle is connected. The device files for serial ports are named /dev/ttyS? and, just as USB ports, the counting starts from zero for the first port. To create the link for a cradle connected to the first serial port, enter the command:
ln -s /dev/ttyS0 /dev/pilot
Initially, it should be sufficient to enable the KAddressBook conduit without changing any of the defaults. After the data has been synchronized for the first time, configure the details: what to do in case of conflicts, the way in which backup databases are saved, and how certain fields as stored on the handheld should be assigned to the fields expected by KAddressBook.
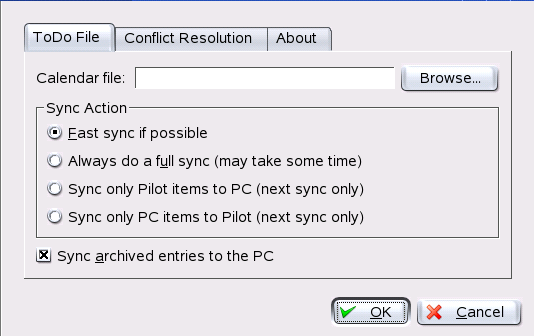
On the KDE desktop, to-dos (tasks) and events (appointments) are managed with KOrganizer. Start the application from the main menu or with the command korganizer. After enabling the calendar and the to-do conduit of KPilot, set some configuration options before using them.
KOrganizer stores its files in the directory ~/.kde/share/apps/korganizer. However, given that the directory .kde/ begins with a dot, it may not be shown by the file selection dialog. In this case enter the complete path manually or explicitly toggle the display of hidden files (dot files) in the file selection dialog. The default shortcut for this is F8.
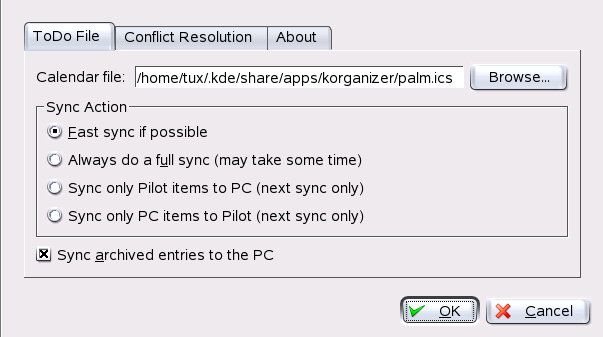
Having opened the directory ~/.kde/share/apps/korganizer, select a file that can be used as a calendar file by KOrganizer. In our example, this is the file palm.ics. In the case of a user called tux, the complete path and file name would be /home/tux/.kde/share/apps/korganizer/palm.ics, as shown in Figure 9.4. “Dialog Showing the Path to a KOrganizer Calendar File”.
KOrganizer should not be running when data is being exchanged with the handheld. Otherwise KPilot will fail to carry out the sync operation.